Transparentgs
[SIGGRAPH'25 (ACM TOG)] TransparentGS: Fast Inverse Rendering of Transparent Objects with Gaussians
TransparentGS: Fast Inverse Rendering of Transparent Objects with Gaussians SIGGRAPH 2025 (ACM Transactions on Graphics) The project is written primarily in Python, distributed under the MIT License license, first published in 2025. Key topics include: 3d-gaussian-splatting, fisheye-camera, inverse-rendering, light-probes, panorama-synthesis.

News
[2025.08.04] 🎈 We release the code.
[2025.07.23] <img class="emoji" title=":smile:" alt=":smile:" src="https://github.githubassets.com/images/icons/emoji/unicode/1f604.png" height="20" width="20"> Birthday of the repository.
TL;DR
We propose TransparentGS, a fast inverse rendering pipeline for transparent objects based on 3D-GS. The main contributions are three-fold: efficient transparent Gaussian primitives for specular refraction, GaussProbe to encode ambient light and nearby contents, and the IterQuery algorithm to reduce parallax errors in our probe-based framework.
Overview
The overview of our TransparentGS pipeline. Each 3D scene is firstly separated into transparent objects and opaque environment using SAM2 [Ravi et al. 2024] guided by GroundingDINO [Liu et al. 2024]. For transparent objects, we propose transparent Gaussian primitives, which explicitly encode both geometric and material properties within 3D Gaussians. And the properties are rasterized into maps for subsequent deferred shading. For the opaque environment, we recover it with the original 3D-GS, and bake it into GaussProbe surrounding the transparent object. The GaussProbe are then queried through our IterQuery algorithm to compute reflection and refraction.
Citation
If you find this work useful in your research, please cite:
bibtex@article{transparentgs, author = {Huang, Letian and Ye, Dongwei and Dan, Jialin and Tao, Chengzhi and Liu, Huiwen and Zhou, Kun and Ren, Bo and Li, Yuanqi and Guo, Yanwen and Guo, Jie}, title = {TransparentGS: Fast Inverse Rendering of Transparent Objects with Gaussians}, journal = {ACM Transactions on Graphics (TOG)}, number = {4}, volume = {44}, month = {July}, year = {2025}, pages = {1--17}, url = {https://doi.org/10.1145/3730892}, publisher = {ACM New York, NY, USA} }
TODO List
- Release the rendering code.
- Release the dataset of transparent objects that we captured ourselves.
- Support the shadow mapping.
- Release the code of segmentation code.
- Release the training/reconstruction code.
TransparentGS Viewer (Renderer)
Functions
- Real-time rendering and navigation of scenes that integrate traditional 3DGS, triangle meshes and reconstructed meshes (Highly robust to complex occlusions).
- Secondary light effects (e.g., reflection and refraction).
- Rendering with non-pinhole camera models (e.g., fisheye or panorama).
- Material editing (e.g., IOR and base color).
- Compatible with 2DGS and supporting scene-level $360^{\circ}$ shadow mapping (shown as follows).

Software Requirements
Because this repository is built upon 3DGS, it is recommended to follow 3DGS's software requirements (as follows); otherwise, the setup/build may fail (e.g., issue #3).
- Conda (recommended for easy setup)
- C++ Compiler for PyTorch extensions (we used Visual Studio 2019 for Windows)
- CUDA SDK 11 for PyTorch extensions, install after Visual Studio (we used 11.8, known issues with 11.6)
- C++ Compiler and CUDA SDK must be compatible
Cloning the Repository and Setup
Clone the repository and create an anaconda environment using
<details> <summary><span style="font-weight: bold;">About the Eigen C++ library</span></summary>shellgit clone git@github.com:LetianHuang/transparentgs.git --recursive cd transparentgs SET DISTUTILS_USE_SDK=1 # Windows only conda env create --file environment.yml conda activate transparentgs
It is notable that the Eigen C++ library eigen==3.4.0 should be downloaded with https://gitlab.com/libeigen/eigen/-/archive/3.4.0/eigen-3.4.0.zip and put into the specified path shown in setup.py:
shell/usr/include/eigen3 /usr/local/include/eigen3 # or C:/Program Files/eigen3 C:/Program Files (x86)/eigen3
If, for some reason, it doesn't work, you can try downloading it from this Google Drive link.
</details>The repository contains several submodules, thus please check it out with
shellpip install . # Thanks to https://github.com/ashawkey/raytracing pip install submodules/diff-gaussian-rasterization pip install submodules/simple-knn pip install submodules/diff-gaussian-rasterization-fisheye pip install submodules/diff-gaussian-rasterization-panorama pip install submodules/diff-surfel-rasterization # Newly Added pip install submodules/diff-gaussian-rasterization_light # Newly Added pip install submodules/nvdiffrast
or choose a faster version (1. integrated with Speedy-Splat, using SnugBox and AccuTile; 2. Employ CUDA scripting for computational acceleration of 64 probes).
shellpip install . pip install submodules-speedy/diff-gaussian-rasterization pip install submodules/simple-knn pip install submodules-speedy/diff-gaussian-rasterization-fisheye pip install submodules-speedy/diff-gaussian-rasterization-panorama pip install submodules/diff-surfel-rasterization # fast version (TODO) pip install submodules/diff-gaussian-rasterization_light # fast version (TODO) pip install submodules-speedy/compute-trilinear-weights pip install submodules/nvdiffrast
Scene Assets
First, create a models folder inside the project path by
shellmkdir models
The data structure will be organised as follows:
transparentgs/
│── models/
│   ├── 3dgs/
│   │   ├── drjohnson.ply
│   │   ├── playroom_lego_hotdog_mouse.ply
│   │   ├── Matterport3D_h1zeeAwLh9Z_3.ply
│   │   ├── ...
│   ├── 2dgs/ (Newly Added)
│   │   ├── garden.ply
│   │   ├── ...
│   ├── mesh/
│   │   ├── ball.ply
│   │   ├── mouse.ply
│   │   ├── bunny.ply
│   │   ├── ...
│   ├── probes/
│   │   ├── playroom_lego_hotdog_mouse/
│   │   │   ├── probes/
│   │   │   │   ├── 000_depth.exr
│   │   │   │   ├── 000.exr
│   │   │   │   ├── 333_depth.exr
│   │   │   │   ├── 333.exr
│   │   │   │   ├── ...
│   │   │   ├── probe.json
│   │   ├── ...
|   ├── meshgs_proxy/
│   │   ├── mouse.ply
│   │   ├── ...
Public scene
We release several ready-to-use scenes. Please download the assets from Google Drive and move the 3dgs (or 2dgs, Newly Added) and mesh folders into models/ folder.
Custom scene
To create a custom scene, simply follow the provided instructions to set it up. Instructions on the above data structure are as follows:
- Scenes in the
3dgsfolder should be in.plyformat and reconstructed using traditional 3DGS, op43dgs (for reconstruction from non-pinhole cameras) or Mip-Splatting (for anti-alias). - Objects in the
meshfolder could be in any triangle mesh format (e.g,.obj,.plyor.glb), including both traditional and reconstructed ones. - Probes in the
probesfolder could be baked usingStep I: Bake GaussProbeor similar formats. Theprobes.jsonfile specifies the positions of the probes, while theprobes/directory stores the corresponding RGB panorama and depth panorama in EXR format. - The
meshgs_proxyfolder is a byproduct ofStep I: Bake GaussProbe. It contains the object converted into 3DGS format and can be used as a proxy of the mesh inmeshto assemble a new scene (mesh+3DGS). Note: modifying the files inmeshgs_proxydoes not affect the final rendering results (i.e.,Step II: Boot up the renderer). To change the proxy configuration, you can adjust the scene’s position under the 3dgs directory and rerunStep I: Bake GaussProbe. - (Newly Added) Scenes in the
2dgsfolder should be in.plyformat and reconstructed using 2DGS.
Step I: Bake GaussProbe
The first step is to bake probes for the scene that has already been set up:
<details> <summary><span style="font-weight: bold;">Command Line Arguments for probes_bake.py</span></summary>shellpython probes_bake.py --W 800 --H 800 --gs_path ./models/3dgs/playroom_lego_hotdog_mouse.ply --probes_path ./models/probes/playroom_lego_hotdog_mouse --mesh ./models/mesh/mouse.ply --begin_id 0
--gs_path
path to the trained 3D Gaussians directory as the environment (used to bake GaussProbe).
--probes_path
output path of GaussProbe to be baked
--mesh
path to the mesh
--W
width of the RGBD panorama
--H
height of the RGBD panorama
--numProbes
number of probes (1/8/64). In theory, any positive integer is allowed, but the released code only supports these three fixed values.
--begin_id
only to prevent OOM (Out of Memory); when GPU memory is insufficient, the process can exit and resume baking from the specified ID.
--scale_ratio
bounding box scale ratio for the mesh
--meshproxy_pitch
the voxel size (pitch), which determines the resolution of the mesh voxelization.
</details>Step II: Boot up the renderer
Next, boot the renderer to start rendering:
<details> <summary><span style="font-weight: bold;">Command Line Arguments for renderer.py</span></summary>shellpython renderer.py --W 960 --H 540 --gs_path ./models/3dgs/playroom_lego_hotdog_mouse.ply --probes_path ./models/probes/playroom_lego_hotdog_mouse --mesh ./models/mesh/mouse.ply --meshproxy_pitch 0.1
--mesh
path to the mesh
--light_type
the original design supports either environment map or GaussProbe. However, since a single probe with zero iteration is equivalent to the environment map, this design has been deprecated.
--gs_path
path to the trained 3D Gaussians directory as the environment (used to bake GaussProbe).
--W
GUI width
--H
GUI height
--radius
default GUI camera radius from center
--fovy
default GUI camera fovy (can be modified in the GUI)
--probes_path
path of the baked GaussProbe
--numProbes
number of probes (1/8/64). In theory, any positive integer is allowed, but the released code only supports these three fixed values. (can be modified in the GUI)
--iters
count of iterations (0-10). In theory, any non-negative integer is allowed, but the released code only supports these eleven fixed values. (can be modified in the GUI)
--meshproxy_pitch
the voxel size (pitch), which determines the resolution of the mesh voxelization.
</details>Full Pipeline (optional)
Additionally, we offer an optional all-in-one pipeline script that produces the same effect as executing Step I and Step II independently:
shellpython full_render_pipeline.py --W 960 --H 540 --probesW 800 --probesH 800 --gs_path ./models/3dgs/playroom_lego_hotdog_mouse.ply --probes_path ./models/probes/playroom_lego_hotdog_mouse --mesh ./models/mesh/mouse.ply --meshproxy_pitch 0.1 # equal to # 1. python probes_bake.py --W 800 --H 800 --gs_path ./models/3dgs/playroom_lego_hotdog_mouse.ply --probes_path ./models/probes/playroom_lego_hotdog_mouse --mesh ./models/mesh/mouse.ply --begin_id 0 --meshproxy_pitch 0.1 # 2. python renderer.py --W 960 --H 540 --gs_path ./models/3dgs/playroom_lego_hotdog_mouse.ply --probes_path ./models/probes/playroom_lego_hotdog_mouse --mesh ./models/mesh/mouse.ply --meshproxy_pitch 0.1
or for 2DGS (Newly Added):
<details> <summary><span style="font-weight: bold;">Command Line Arguments for renderer.py</span></summary>shellpython full_render_pipeline.py --W 960 --H 540 --probesW 800 --probesH 800 --gs_path ./models/2dgs/garden.ply --probes_path ./models/probes/garden_ball --mesh ./models/mesh/ball.ply --meshproxy_pitch 0.1 --numProbes 64 # equal to # 1. python probes_bake.py --W 800 --H 800 --gs_path ./models/2dgs/garden.ply --probes_path ./models/probes/garden_ball --mesh ./models/mesh/ball.ply --begin_id 0 --numProbes 64 # 2. python renderer.py --W 960 --H 540 --gs_path ./models/2dgs/garden.ply --probes_path ./models/probes/garden_ball --mesh ./models/mesh/ball.ply --meshproxy_pitch 0.1 --numProbes 64
--mesh
path to the mesh
--light_type
the original design supports either environment map or GaussProbe. However, since a single probe with zero iteration is equivalent to the environment map, this design has been deprecated.
--gs_path
path to the trained 3D Gaussians directory as the environment (used to bake GaussProbe).
--W
GUI width
--H
GUI height
--radius
default GUI camera radius from center
--fovy
default GUI camera fovy (can be modified in the GUI)
--probes_path
path of the baked GaussProbe
--numProbes
number of probes (1/8/64). In theory, any positive integer is allowed, but the released code only supports these three fixed values. (can be modified in the GUI)
--iters
count of iterations (0-10). In theory, any non-negative integer is allowed, but the released code only supports these eleven fixed values. (can be modified in the GUI)
--meshproxy_pitch
the voxel size (pitch), which determines the resolution of the mesh voxelization.
--probesW
width of the RGBD panorama
--probesH
height of the RGBD panorama
--begin_id
only to prevent OOM (Out of Memory); when GPU memory is insufficient, the process can exit and resume baking from the specified ID.
--scale_ratio
bounding box scale ratio for the mesh
--just_render
if using this argument, it will be equivalent to running renderer.py.
Renderer GUI Tutorial
The following GUI usage tutorial is provided based on the current release. It is recommended to watch this in conjunction with the video available on the project homepage.
Move the camera
Bear resemblance to raytracing.
- drag rotate: move with the left mouse button.
- drag translation: move with the middle mouse button
- move closer: move with the wheel
Options and Debug
- Options: the main ways to control, aside from moving the camera.
- Debug: display the camera pose.
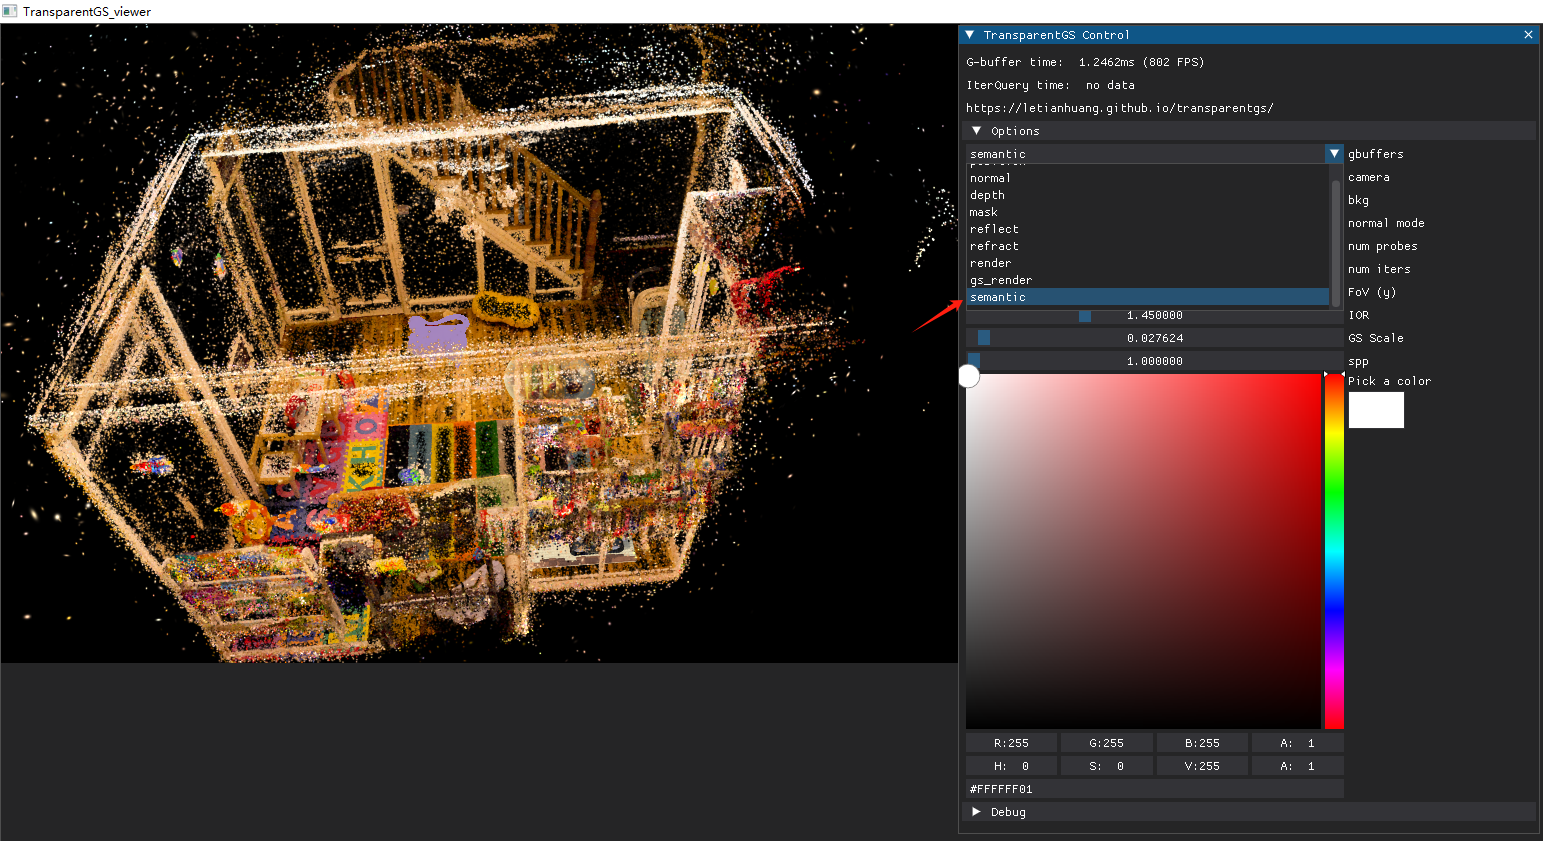
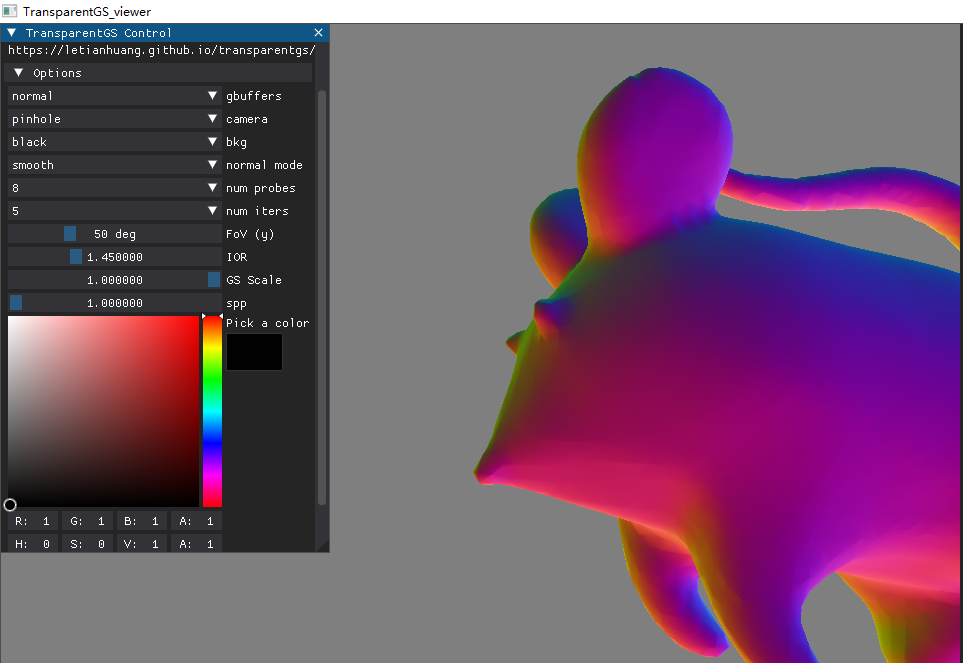
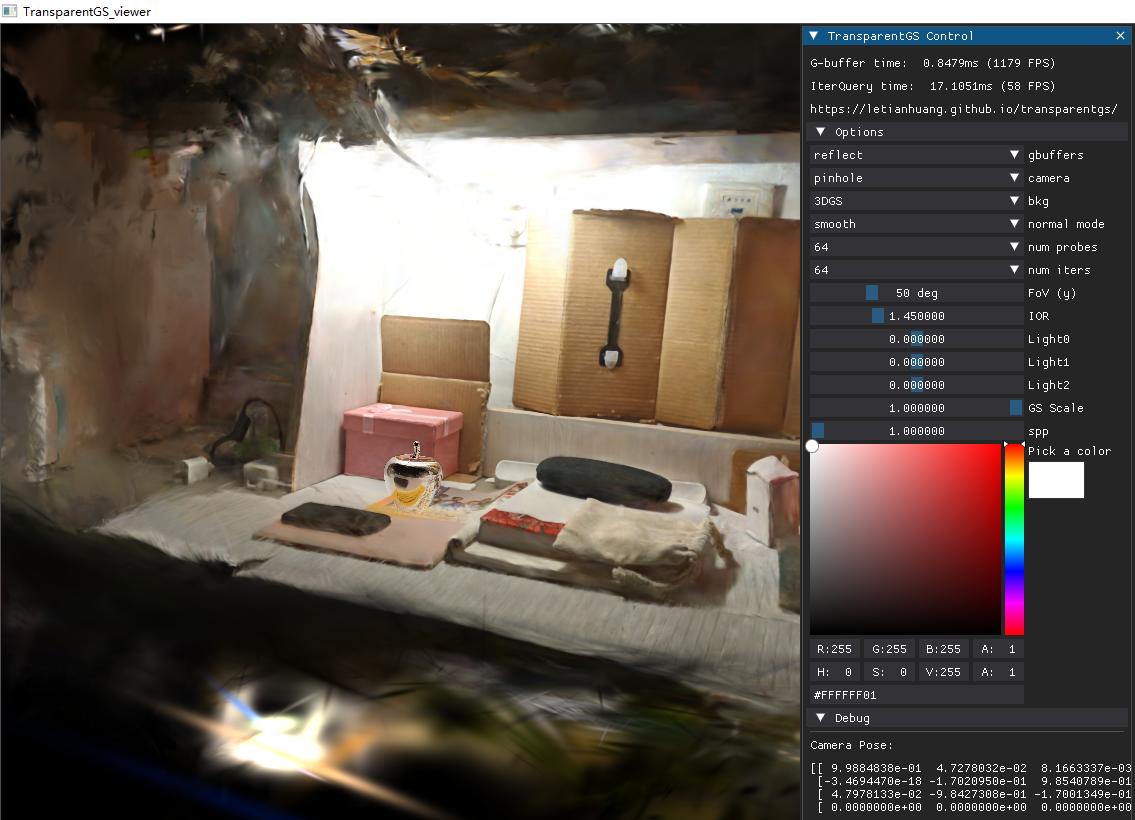
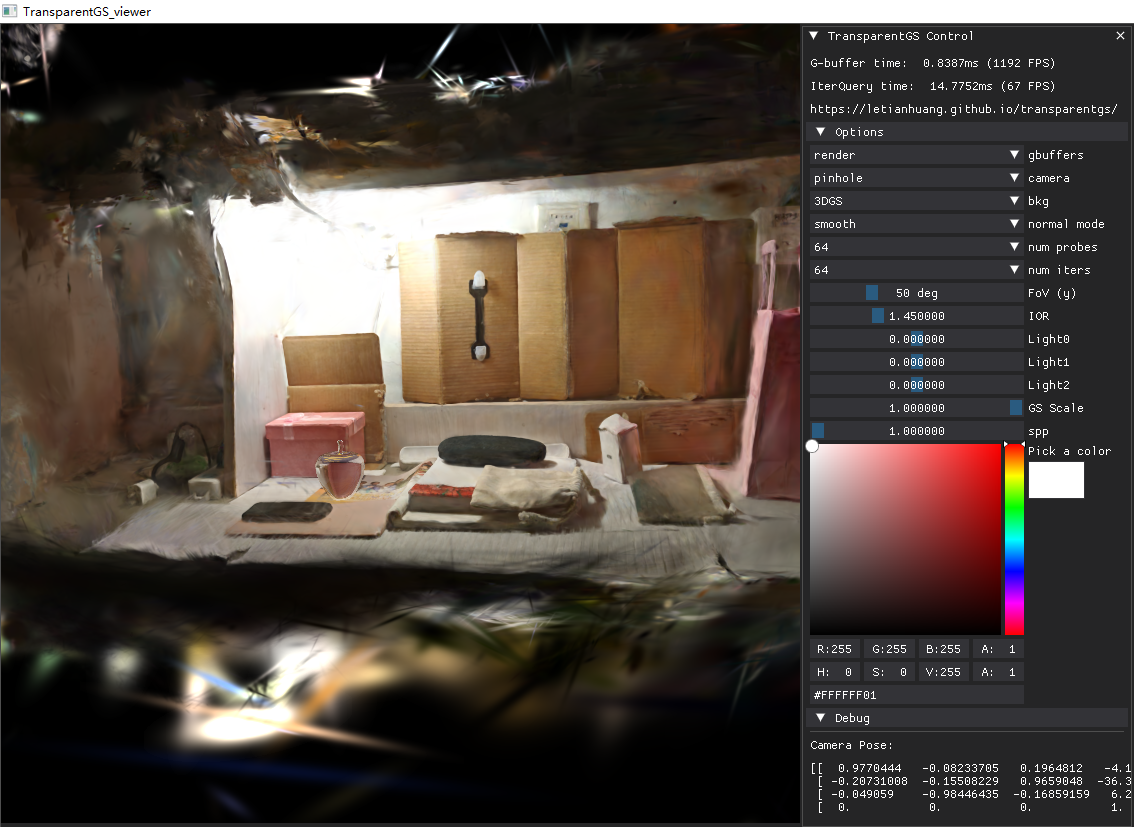
gbuffers in Options
Common G-buffers in typical renderers (depth, mask, normal, position), with special attention to:
- reflect: the reflection component (mesh).
also works for 2DGS
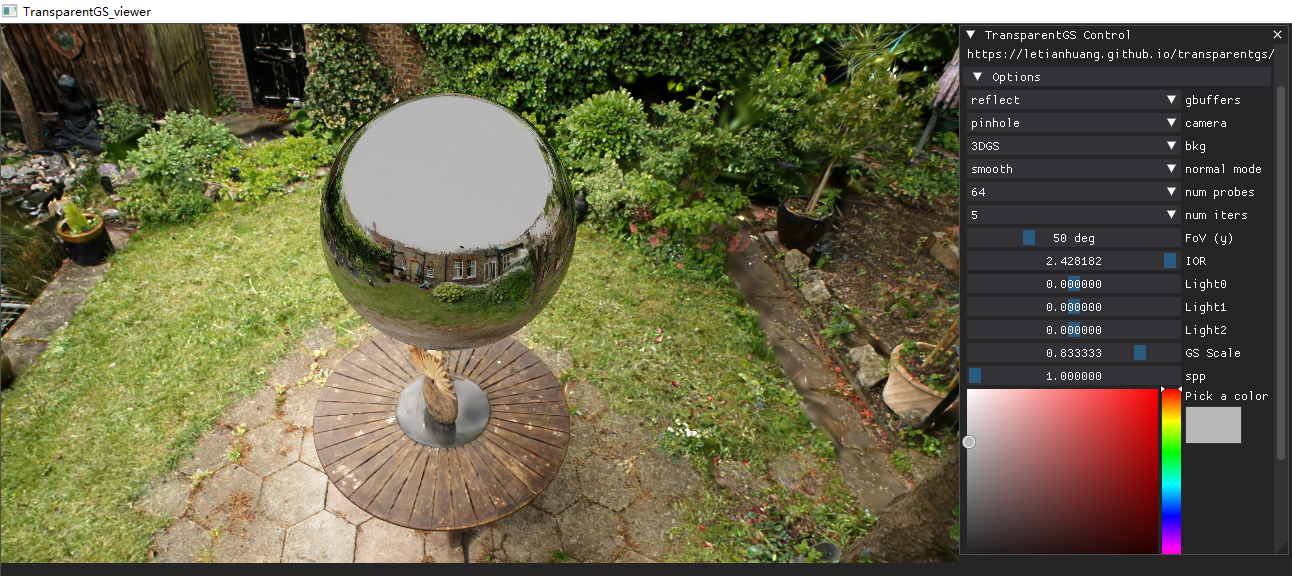
- refract: the refraction component (mesh).

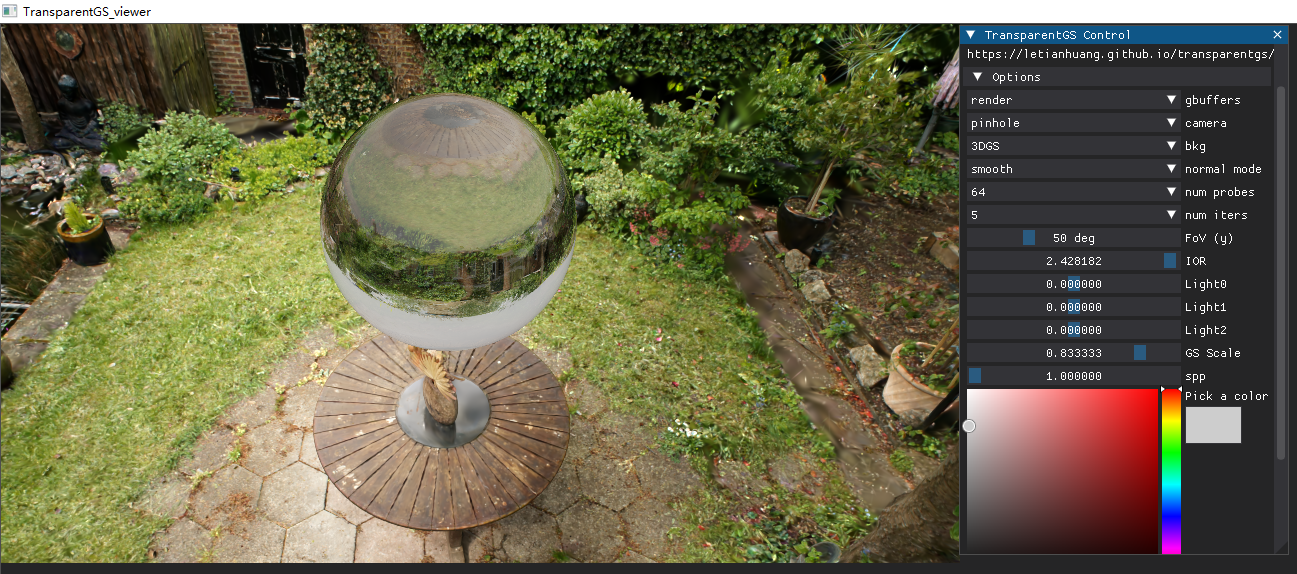
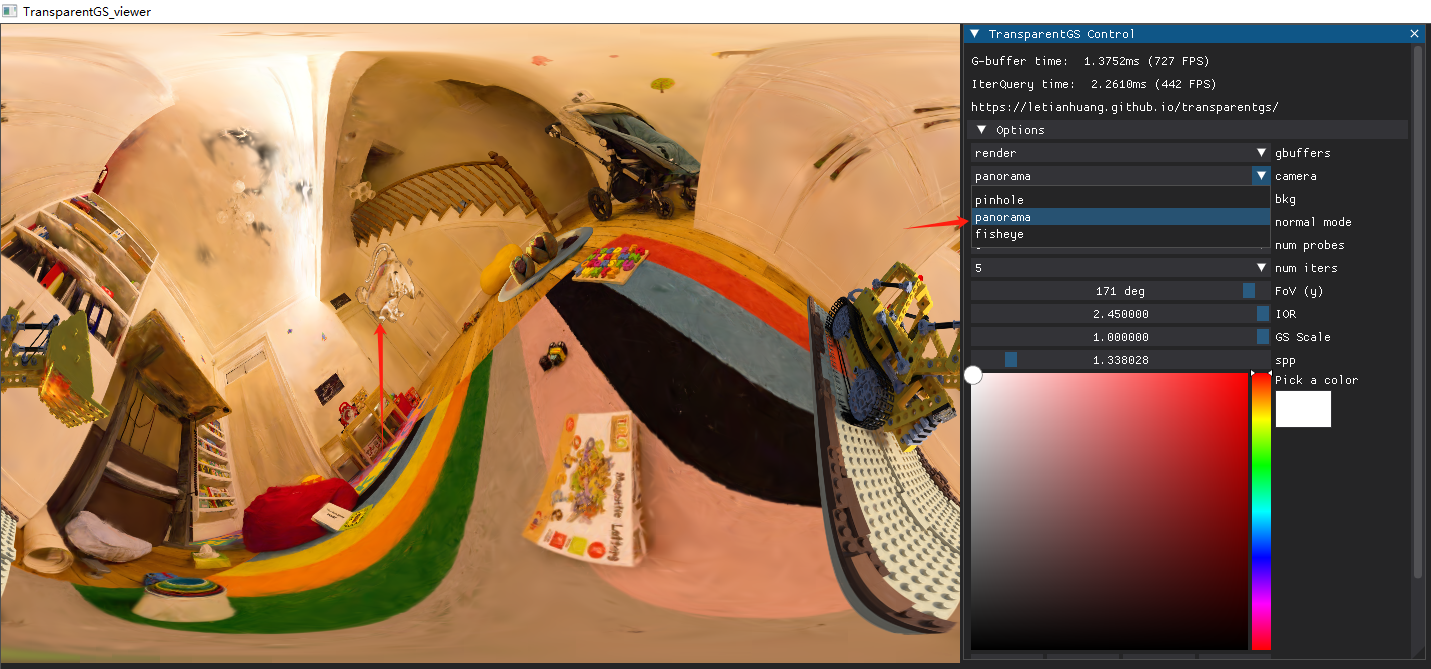
- render: the weighted sum of the reflection and refraction components using the Fresnel term (mesh).
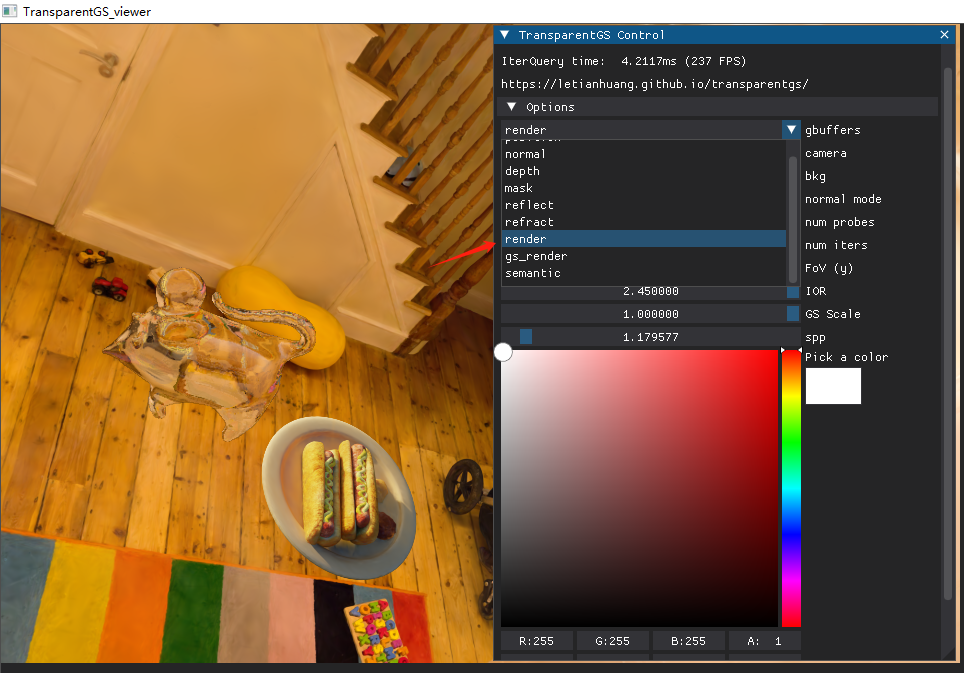
also works for 2DGS
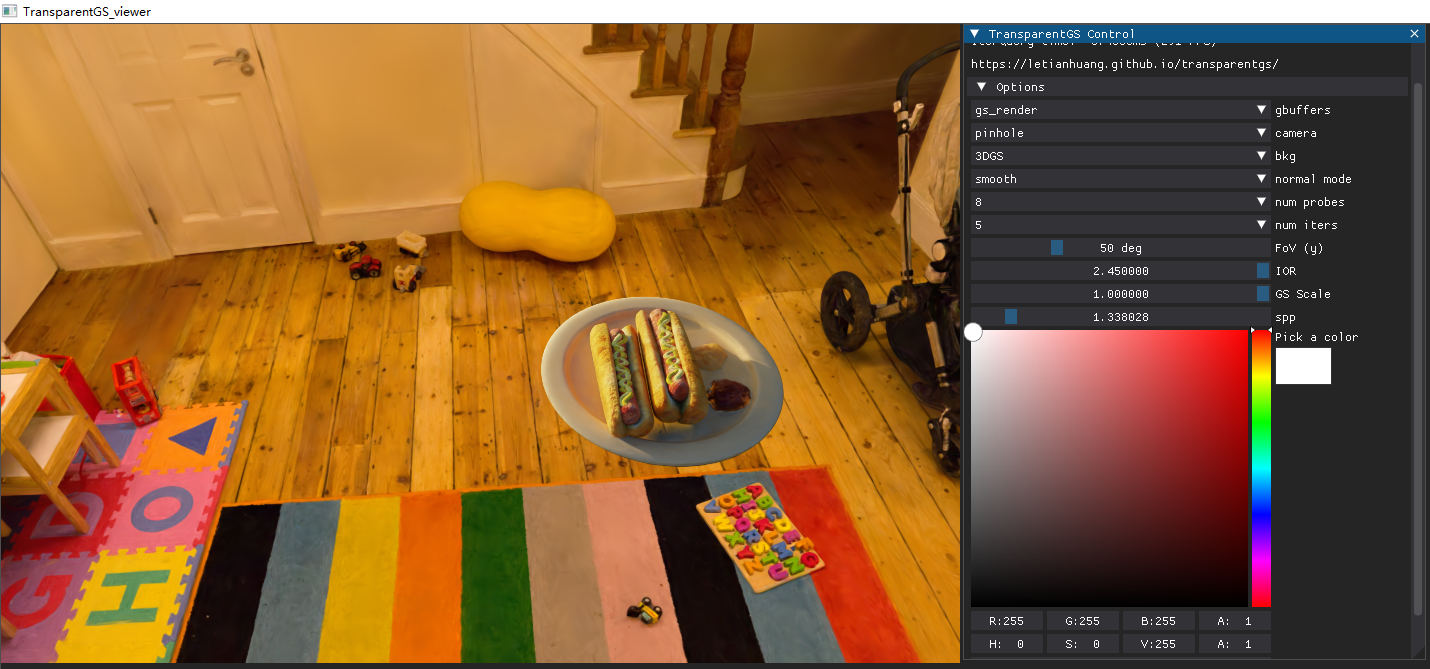
- gs_render: the rendering result obtained using only traditional Gaussian primitives (3DGS).
- semantic: the result of hybrid rendering with Gaussians and meshes (mesh + 3DGS). Pixels belonging to the mesh are replaced with a uniform color that represents the same semantic label (e.g., purple).
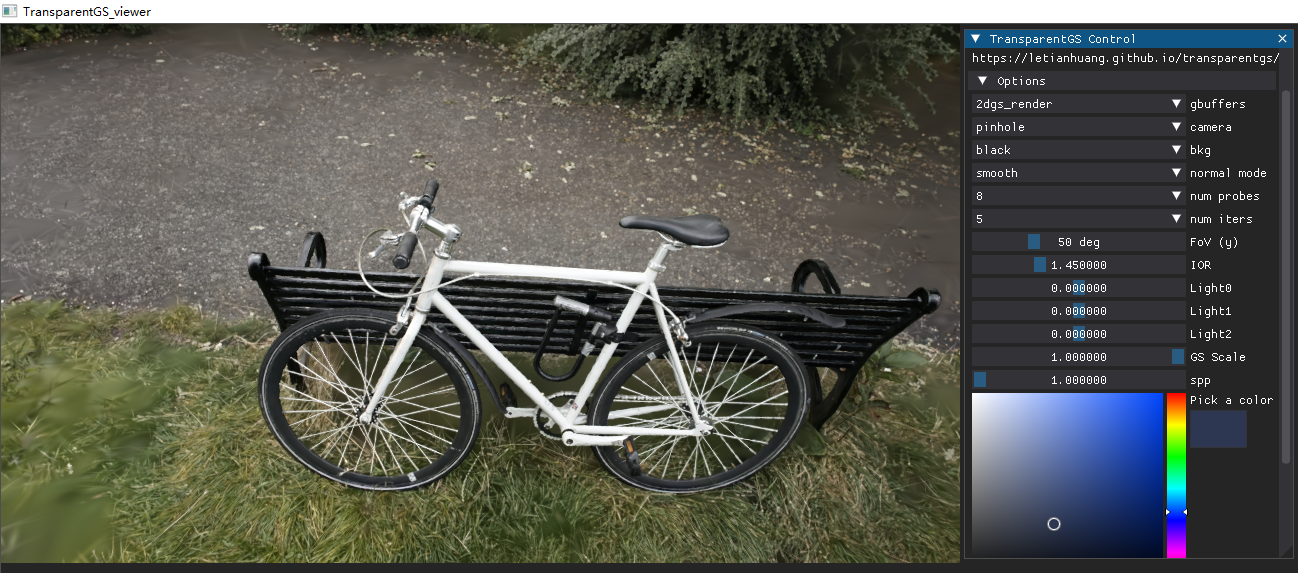
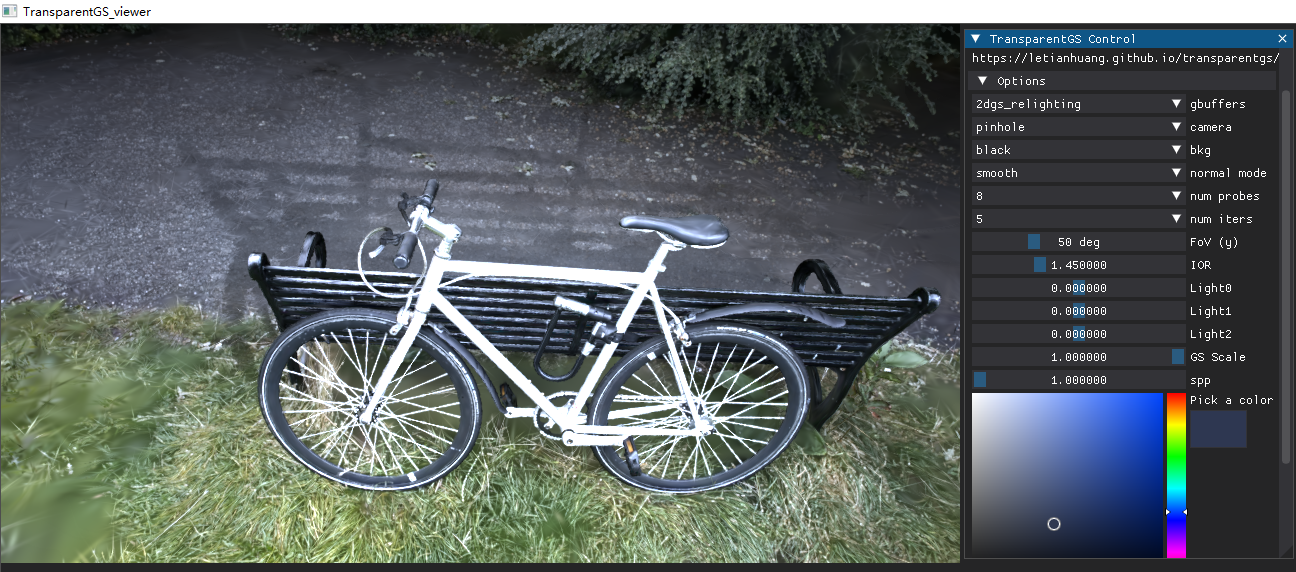
- 2dgs_render: (Newly Added, only work for
2dgs) the rendering result obtained using 2DGS.
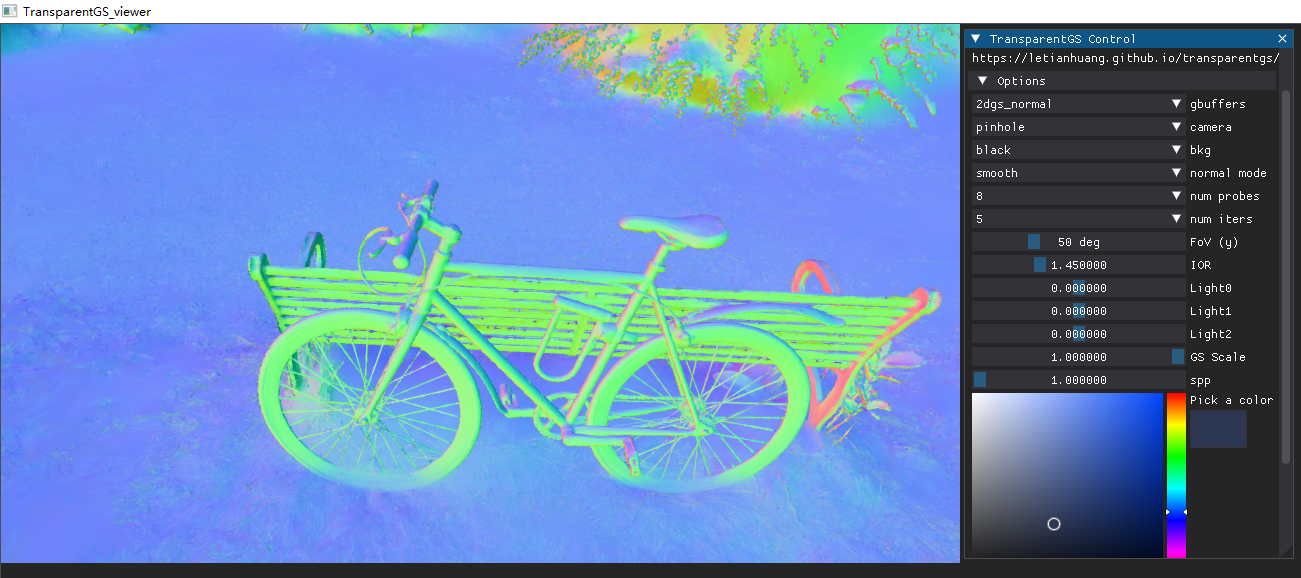
- 2dgs_normal: (Newly Added, only work for
2dgs) the normal map obtained using 2DGS.
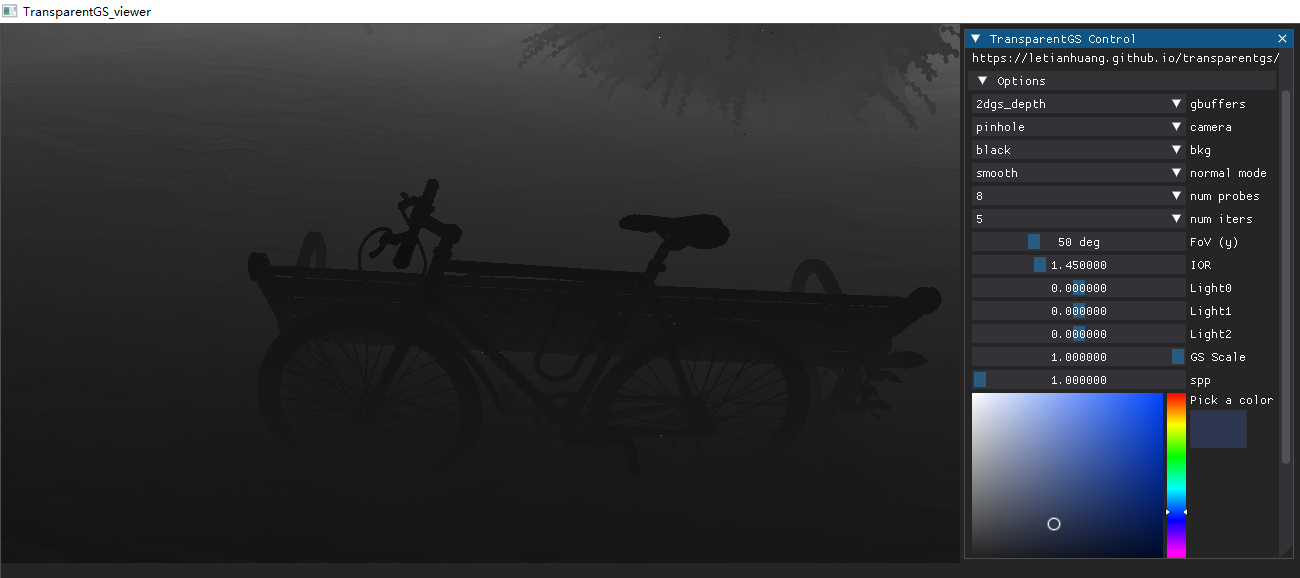
- 2dgs_depth: (Newly Added, only work for
2dgs) the depth map obtained using 2DGS.
- 2dgs_relighting: (Newly Added, only work for
2dgs) the relighting result with shadow obtained using 2DGS.
camera
Select the camera model.
- pinhole: the regular camera model which 3DGS also supports.
- fisheye: It can support a field of view (FOV) of up to 180°.
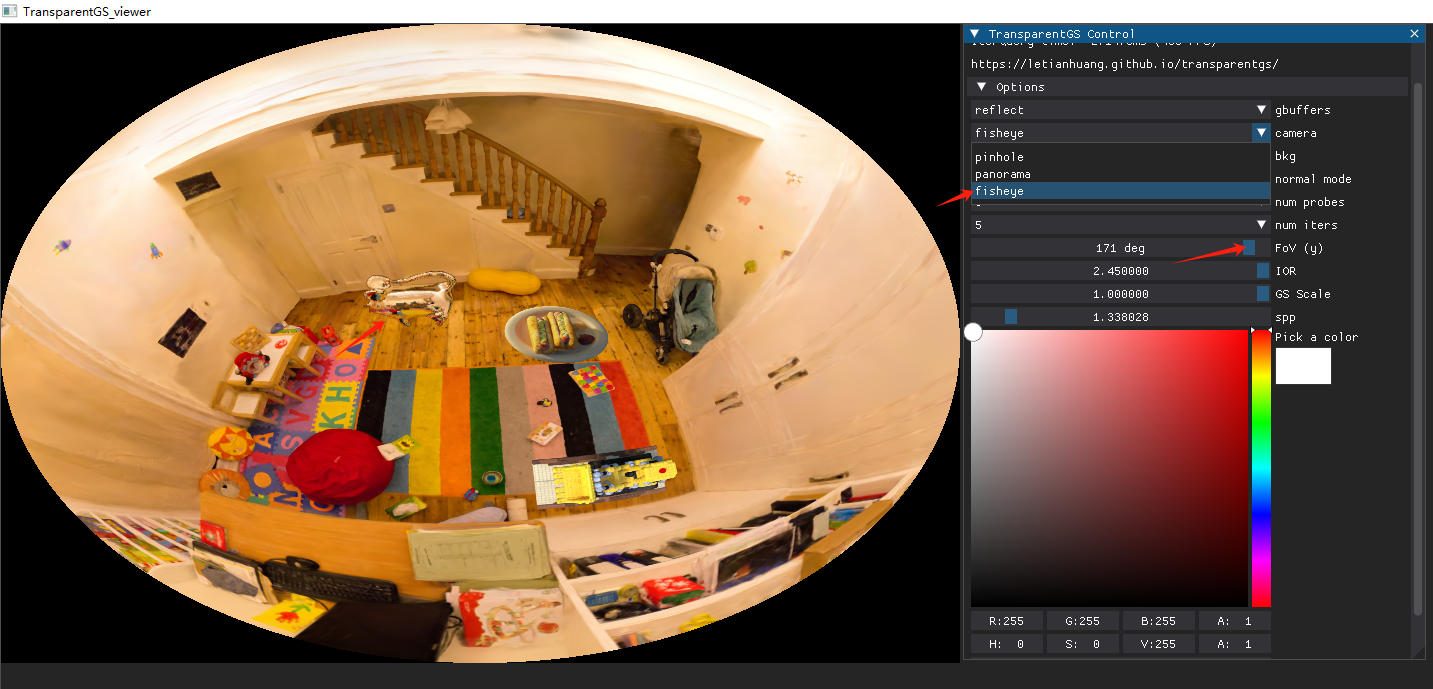
- panorama: It can support a field of view (FOV) of 360°.
bkg
Select the background of the mesh.
- black: black color as the background
- white: white color as the background
- 3DGS: Hybrid rendering of 3DGS and transparent objects (
reflect,refract,render,normal).
normal mode
Select whether to apply normal smoothing.
- raw: no
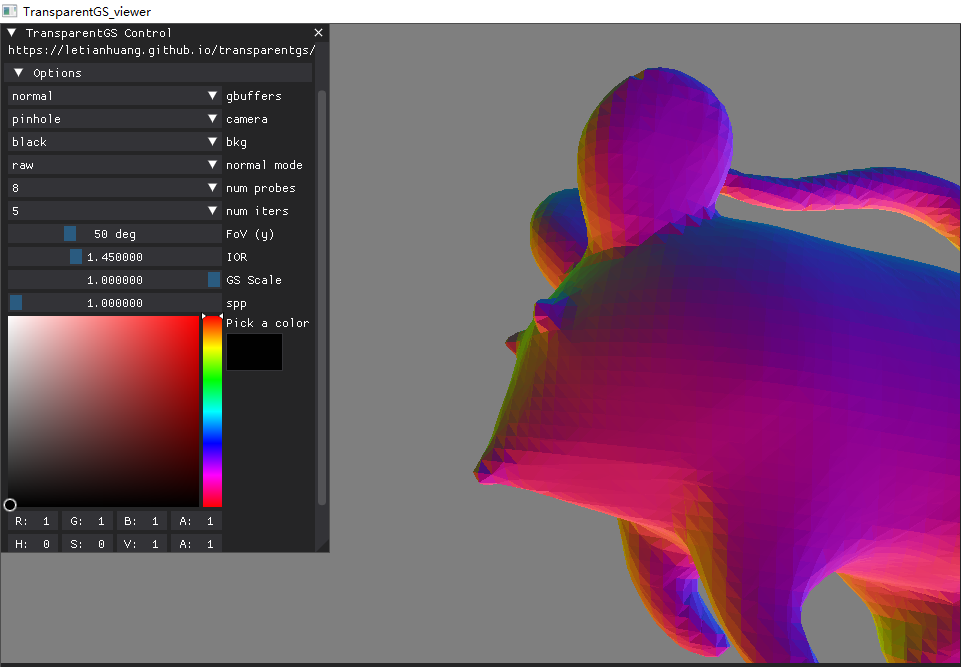
- smooth: yes
num probes
As changing the number of probes involves I/O overhead, it is not recommended to modify it through the GUI. It is advisable to configure it beforehand using terminal arguments. Additionally, increasing the number of probes demands more GPU memory.
num iters
Modify the count of iterations of IterQuery (0-10). In theory, any non-negative integer is allowed, but the released code only supports these eleven fixed values. Setting it to zero clearly demonstrates the superiority of the IterQuery.
FoV (y)
Modifying the field of view (FOV), particularly for fisheye cameras, allows reaching up to a 180° viewing angle.
IOR
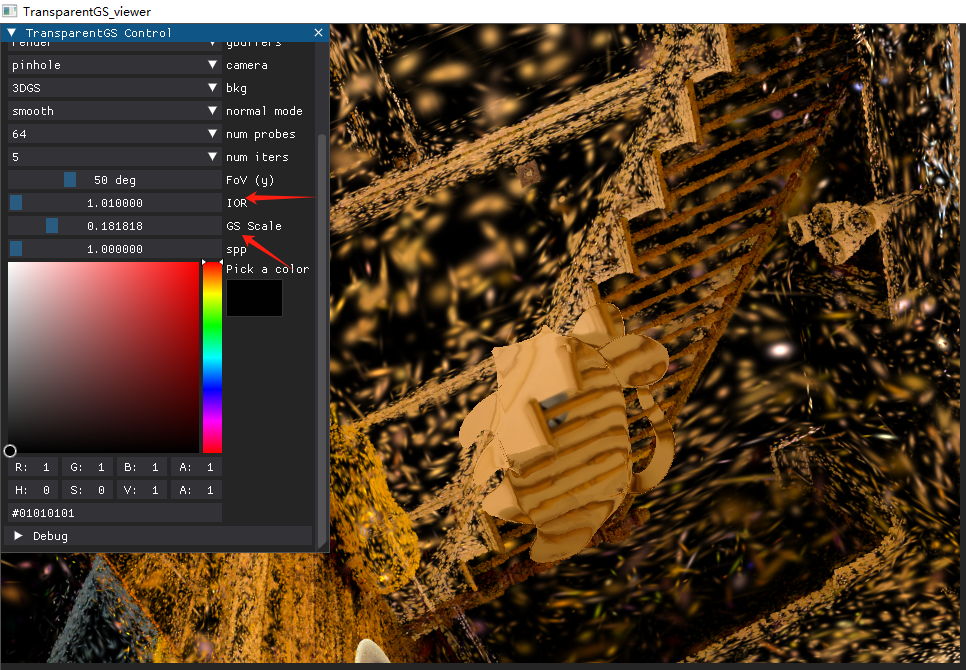
This mainly affects gbuffers with refract or render properties. When the IOR is approximately 1, the result is almost identical to the background, demonstrating the high quality of IterQuery (especially with 64 probes).
GS scale
Note that only the scale of the 3dgs primitives is modified, not the overall scene scaling. Therefore, reducing the scale allows us to observe the gaps between Gaussians.
spp
Control the sampling rate of mesh ray tracing.
Pick a color
Modify the color of the mesh.
Dataset
We release several self-captured scenes for reconstruction purposes. Please download the transparent object dataset from Google Drive.
Standalone demo : Segmentation
Please refer to grounded_sam2.
Training Pipeline
The environtment of this part is the same as the renderer/viewer.
Assume that you have already segmented the scene using the segmentation module we have released, and that you have reconstructed the opaque environment with the original 3D Gaussian Splatting, resulting in the mask directory and env_gs.ply, respectively. In other words, you should have obtained a dataset with a structure similar to the dataset we have released.
A simple example is as follows:
shellpython simple_full_recon_pipeline.py \ -s {DATA_PATH} \ -m {MODEL_PATH} \ --probesW {resolution of probes} \ --probesH {resolution of probes} \ --numProbes 64 \ --meshproxy_pitch 0.1 \ --scale_ratio {scale ratio of aabb} \ --skip_base {skip baking if you have baked} \ --viewer {use this argument if you wanna see the rendering result} \ --viewer_mode {view the coarse or fine version} \ --sdf_end_iter {iterations for the SDF} \ --mesh_end_iter {iterations for the mesh proxy part} \ --mesh_r {image resolution for the mesh proxy part} \ ... # the same as the original 3DGS
More details and explanations on this part will be released soon, subject to our available time. In addition, we would like to sincerely thank our collaborators for taking the time out of their busy schedules to help organize this part.
Acknowledgements
This project is built upon 3DGS, GaussianShader, GlossyGS, op43dgs, raytracing, nvdiffrast, instant-ngp, SAM2, GroundingDINO, SAM, GroundedSAM, 2DGS, GS$^{3}$, NeuS, NeTO and so on. Please follow the licenses. We thank all the authors for their great work and repos. We sincerely thank our colleagues for their valuable contributions to this project.
Contributors
Showing top 2 contributors by commit count.


Related Repositories

playcanvas/engine
Powerful web graphics runtime built on WebGL, WebGPU, WebXR and glTF
playcanvas/supersplat
3D Gaussian Splat Editor

MrNeRF/awesome-3D-gaussian-splatting
Curated list of papers and resources focused on 3D Gaussian Splatting, intended to keep pace with the anticipated surge of research in the coming months.

Anttwo/SuGaR
[CVPR 2024] Official PyTorch implementation of SuGaR: Surface-Aligned Gaussian Splatting for Efficient 3D Mesh Reconstruction and High-Quality Mesh Rendering

Awesome3DGS/3D-Gaussian-Splatting-Papers
3D高斯论文,持续更新,欢迎交流讨论。

mkkellogg/GaussianSplats3D
Three.js-based implementation of 3D Gaussian splatting