Peax
Peax is a tool for interactive visual pattern search and exploration in epigenomic data based on unsupervised representation learning with autoencoders
**A Visual Pattern Explorer For Epigenomic Data Using Unsupervised Deep Representation Learning** The project is written primarily in Jupyter Notebook, distributed under the Other license, first published in 2018. Key topics include: autoencoder, data-visualization, deep-learning, epigenomics, interactive-machine-learning.
A Visual Pattern Explorer For Epigenomic Data Using Unsupervised Deep Representation Learning
</div> <div align="center">![]()
![]()
![]()
![]()
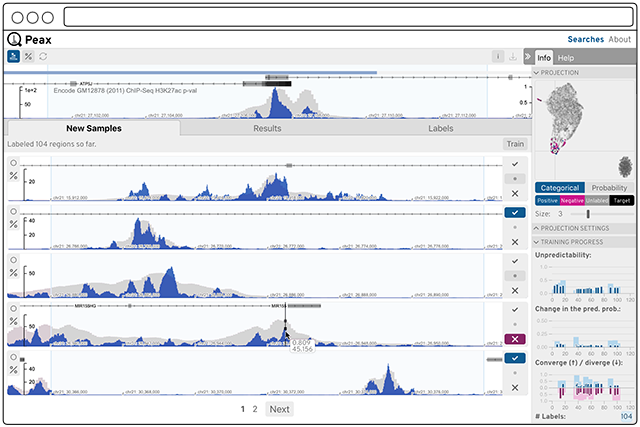
Epigenomic data expresses a rich body of diverse patterns that help to identify regulatory elements like promoter, enhancers, etc. But finding these patterns reliably genome wide is challenging. Peax is a tool for interactive visual pattern search and exploration of epigenomic patterns based on unsupervised representation learning with convolutional autoencoders. The visual search is driven by manually labeled genomic regions for actively learning a classifier to reflect your notion of interestingness.
Citation: Lekschas et al., Peax: Interactive Visual Pattern Search in Sequential Data Using Unsupervised Deep Representation Learning,
Computer Graphics Forum, 2020, doi: 10.1111/cgf.13971.
More Details: peax.lekschas.de
Installation
Requirements:
- Conda >= 4.8
Install:
bashgit clone https://github.com/Novartis/peax && cd peax make install
Do not fear, make install is just a convenience function for setting up conda and installing npm packages.
Notes:
- If you're a macOS user you might need to brew install
libpngandopensslfor the pybbi package (see here) andxzfor pysam (if you see an error related tolzma.h).
Overview
Peax consists of three main parts:
- A server application for serving genomic and autoencoded data on the web. [/server].
- A user interface for exploring, visualizing, and interactively labeling genomic regions. [/ui].
- A set of examples showing how to configure Peax and build your own. [/examples]
Data
We provide 6 autoencoders trained on 3 kb, 12 kb, and 120 kb window sizes (with 25,
100, and 1000 bp binning) on DNase-seq and histone mark ChIP-seq data (H3K4me1, H3K4me3, H3K27ac, H3K9ac, H3K27me3, H3K9me3, and H3K36me).
You can find detailed descriptions of the autoencoders at zenodo.org/record/2609763. When you follow the Quick Start instructions, you will automatically download the related autoencoders.
Quick start
Peax comes with 6 autoencoders for DNase-seq and histone mark
ChIP-seq data and several example configurations for which we provide
convenience scripts to get you started as quickly as possible.
For instance, run one of the following commands to start Peax with a DNase-seq
track for 3 kb, 12 kb, and 120 kb genomic windows.
| Command | Window Size | Step Freq. | Chromosomes |
|---|---|---|---|
make example-3kb | 3 kb | 2 | 21 |
make example-12kb | 12 kb | 3 | 20-21 |
make example-120kb | 120 kb | 6 | 17-21 |
Note: The first time Peax is started it will precompute the datasets for
exploration. This can take a few minutes depending on your hardware. Also, these demos
will only prepare the above mentioned chromosomes, so don't try to search for patterns
on another chromosome. It won't work! For your own data you can freely configure this
of course.
The scripts will download test ENCODE tracks and use the matching
configuration to start the server. More examples are described in /examples.
Get Started
In the following we describe how you can configure Peax for your own data.
Configure Peax with your data
Next, you need to configure Peax with your data to tell it which tracks you want to visualize in HiGlass and which of those tracks are encodable using an (auto)encoder.
The fastest way to get started is to copy the example config:
cp config.json.sample config.json
The config file has 10 top level properties:
| Field | Description | Dtype |
|---|---|---|
| encoders | List of encoders. | list |
| datasets | List of tracks. | list |
| coords | Genome coordinates. Peax currently supports hg19, hg38, mm9, and mm10 | str |
| chroms | Chromosomes to to be searched. If omitted all chromosomes will be prepared for searching. | list |
| step_freq | Step frequency of the sliding window approach. E.g., given an encoder with window size 12 kb, a step frequency of 6 means that every 2 kb a 12 kb window will be extracted from the bigWig. | int |
| db_path | Relative path to the sqlite db for storing searches. | str |
| normalize_tracks | If true the y-scale of tracks within a window will be normalized to the minimum and maximum value. This is useful for exploring differential signal. | bool |
| variable_target | If true the window with the highest prediction probability will be shown in the query view. | bool |
| classifier | The class name of an SciKit Learn Classifier | str |
| classifier_params | A dictionary of parameters to customize the classifier | obj |
The main parts to adjust are encoders and datasets. encoders is a list of
(auto)encoder definitions for different datatypes.T here are two ways to
configure an (auto)encoder: (a) point to a pre-defined autoencoder or (b)
configure from scratch.
Assuming you want to use predefined encoders all you have to do is to specify the path to the encoder configuration
Example:
json{ "encoders": "examples/encoders.json" }
The encoder configuration file is a dictionary with the top level keys acting
as the identifier. Given the example from above the file could look like this:
json{ "histone-mark-chip-seq-3kb": {}, "dnase-seq-3kb": {} }
See [encoders.json](encoders.json) for an example. The specific definition if an
autoencoder is the same as described in the following.
To configure an autoencoder from scratch you need to provide a dictionary with
the following required format:
| Field | Description | Defaults | Dtype |
|---|---|---|---|
| autoencoder | Relative path to your pickled autoencoder model. (hdf5 file) | str | |
| encoder | Relative path to your pickled encoder model. (hdf5 file) | str | |
| decoder | Relative path to your pickled decoder model. (hdf5 file) | str | |
| content_type | Unique string describing the content this autoencoder can handle. Data tracks with the same content type will be encoded by this autoencoder. | str | |
| window_size | Window size in base pairs used for training the autoencoder. | int | |
| resolution | Resolution or bin size of the window in base pairs. | int | |
| latent_dim | Number of latent dimensions of the encoded windows. | int | |
| input_dim | Number of input dimensions for Keras. For 1D data these are 3: samples, data length (which is window_size / resolution), channels. | 3 | int |
| channels | Number of channels of the input data. This is normally 1. | 1 | int |
| model_args | List of arguments passed to a custom encoder model | 1 | int |
Note that if you have specified an autoencoder you do not need to provide
separate encoder and decoder models.
Example:
json{ "encoder": "path/to/my-12kb-chip-seq-encoder.h5", "decoder": "path/to/my-12kb-chip-seq-decoder.h5", "content_type": "histone-mark-chip-seq", "window_size": 12000, "resolution": 100, "channels": 1, "input_dim": 3, "latent_dim": 12 }
Datasets require the following format:
| Field | Description | Dtype |
|---|---|---|
| filepath | Relative path to the data file (bigWig or bigBed). | str |
| content_type | Unique string describing the content this dataset. If you want to search for patterns in this track you need to have an autoencoder with a matching content type. | str |
| id | A unique string identifying your track. (Optional) | str |
| name | A human readable name to be shown in HiGlass. (Optional) | str |
Example:
json{ "filepath": "data/chip-seq/my-fancy-gm12878-chip-seq-h3k27ac-fc-signal.bigWig", "content_type": "histone-mark-chip-seq", "uuid": "my-fancy-gm12878-chip-seq-h3k27c-track", "name": "My Fancy GM12878 ChIP-Seq H3k27c Track" }
Start Peax
First, start the Peax server to serve your data.
Note: The first time you run Peax on a new dataset all the data will be prepared!
Depending on your machine this can take some time. If you want to track the progress
activate the debugging mode using -d.
bashpython start.py
Now go to http://localhost:5000.
To start.py script supports the following options:
bashusage: start.py [-h] [-c CONFIG] [--clear] [--clear-cache] [--clear-cache-at-exit] [--clear-db] [-d] [--host HOST] [--port PORT] [-v] Peak Explorer CLI optional arguments: -h, --help show this help message and exit -c CONFIG, --config CONFIG path to your JSON config file -b BASE_DATA_DIR, --base-data-dir BASE_DATA_DIR base directory which the config file refers to --clear clears the cache and database on startup --clear-cache clears the cache on startup --clear-cache-at-exit clear the cache on shutdown --clear-db clears the database on startup -d, --debug turn on debug mode --host HOST customize the hostname --port PORT customize the port -v, --verbose turn verbose logging on
The hostname defaults to localhost and the port of the backend server defaults
to 5000.
In order to speed up subsequend user interaction, Peax initially prepapres all
the data and caches that data under /cache. You can always remove this
directory manually or clear the cache on startup or at exist using the --clear
as specified above.
Development
Handy commands to keep in mind:
make installinstalls the conda environment and npm packages and builds the UImake updateupdates the conda environment and npm packages and rebuilds the UImake buildbuilds the UIpython start.pystarts the Flask server application for serving data- [/ui]:
npm installinstalls and updates all the needed packages for the frontend - [/ui]:
npm buildcreates the production built of the frontend - [/ui]:
npm startstarts a dev server with hot reloading for the frontend
To start developing on the server and the ui in parallel, first start the backend server
application using ./start.py and then start the frontend server application from
./ui using npm start. Both server's watch the source code, so whenever you make
changes to the source code the servers will reload.
Configuration
There are 2 types of configuration files. The backend server configuration
defines the datasets to explore and is described in detail above.
Additionally, the frontend application can be configured to talk to a different backend
server and port if needed. Get started by copying the example configuration:
bashcd ui && cp config.json.sample config.json
By default the server is dynamically set to the hostname of the server running the
frontend application. I.e., it is assumed that the backend server application is
running on the same host as the frontend application. The port of the server
defaults to 5000.
Start the backend and frontend apps
For development the backend and frontend applications run as seperate server
applications.
bash# Backend server ./start.py --debug --config path/to/your/config.json # Frontend server cd ui && npm start
Contributors
Showing top 3 contributors by commit count.


Related Repositories

MorvanZhou/PyTorch-Tutorial
Build your neural network easy and fast, 莫烦Python中文教学

BinRoot/TensorFlow-Book
Accompanying source code for Machine Learning with TensorFlow. Refer to the book for step-by-step explanations.
MorvanZhou/Tensorflow-Tutorial
Tensorflow tutorial from basic to hard, 莫烦Python 中文AI教学

podgorskiy/ALAE
[CVPR2020] Adversarial Latent Autoencoders

NELSONZHAO/zhihu
This repo contains the source code in my personal column (https://zhuanlan.zhihu.com/zhaoyeyu), implemented using Python 3.6. Including Natural Language Processing and Computer Vision projects, such as text generation, machine translation, deep convolution GAN and other actual combat code.

golbin/TensorFlow-Tutorials
텐서플로우를 기초부터 응용까지 단계별로 연습할 수 있는 소스 코드를 제공합니다