Qmpbackup
Qemu Backup tool: Create full and incremental backups of running qemu machines by using dirty-bitmaps
qmpbackup is designed to create live full and incremental backups of running qemu virtual machines via QMP protocol. It makes use of the dirty-bitmap feature introduced in later QEMU versions. It works with standalone QEMU processes. The project is written primarily in Python, distributed under the GNU General Public License v3.0 license, first published in 2016. Key topics include: backup, incremental, kvm, kvm-hypervisor, linux-server.
![]()
qmpbackup
qmpbackup is designed to create live full and incremental backups of running
qemu virtual machines via QMP protocol. It makes use of the dirty-bitmap
feature introduced in later QEMU versions. It works with standalone QEMU
processes.
If you want to backup QEMU virtual machines managed by libvirt, see this
project:
https://github.com/abbbi/virtnbdbackup
<!-- START doctoc generated TOC please keep comment here to allow auto update --> <!-- DON'T EDIT THIS SECTION, INSTEAD RE-RUN doctoc TO UPDATE -->Table of Contents
<!-- END doctoc generated TOC please keep comment here to allow auto update -->Installation
qmpbackup makes use of qemu.qmp
 python3 -m venv venv
 source venv/bin/activate
 pip3 install -r requirements.txt
 python3 setup.py install (alternatively use: `python -m pip install .` on systems deprecating setuptools)
Prerequisites
The virtual machine must be reachable via QMP protocol on a unix socket,
usually this happens by starting the virtual machine via:
qemu-system-<arch> <options> -qmp unix:/path/to/socket,server,nowait
You can also configure qemu to provide the QMP protocol via TCP endpoint:
qemu-system-<arch> <options> -qmp tcp:localhost:4444,server,wait=off
qmpbackup uses this socket to pass required commands to the virtual machine.
Note: Use a dedicated socket for backup operations if possible, as qmp
sockets only allow one connection at a time.
Supported QEMU versions
Up until Version 0.45
QEMU <= 7.0.0 is supported, all later versions introduce image
fleecing and require at least QEMU Version
7.1.
Usage
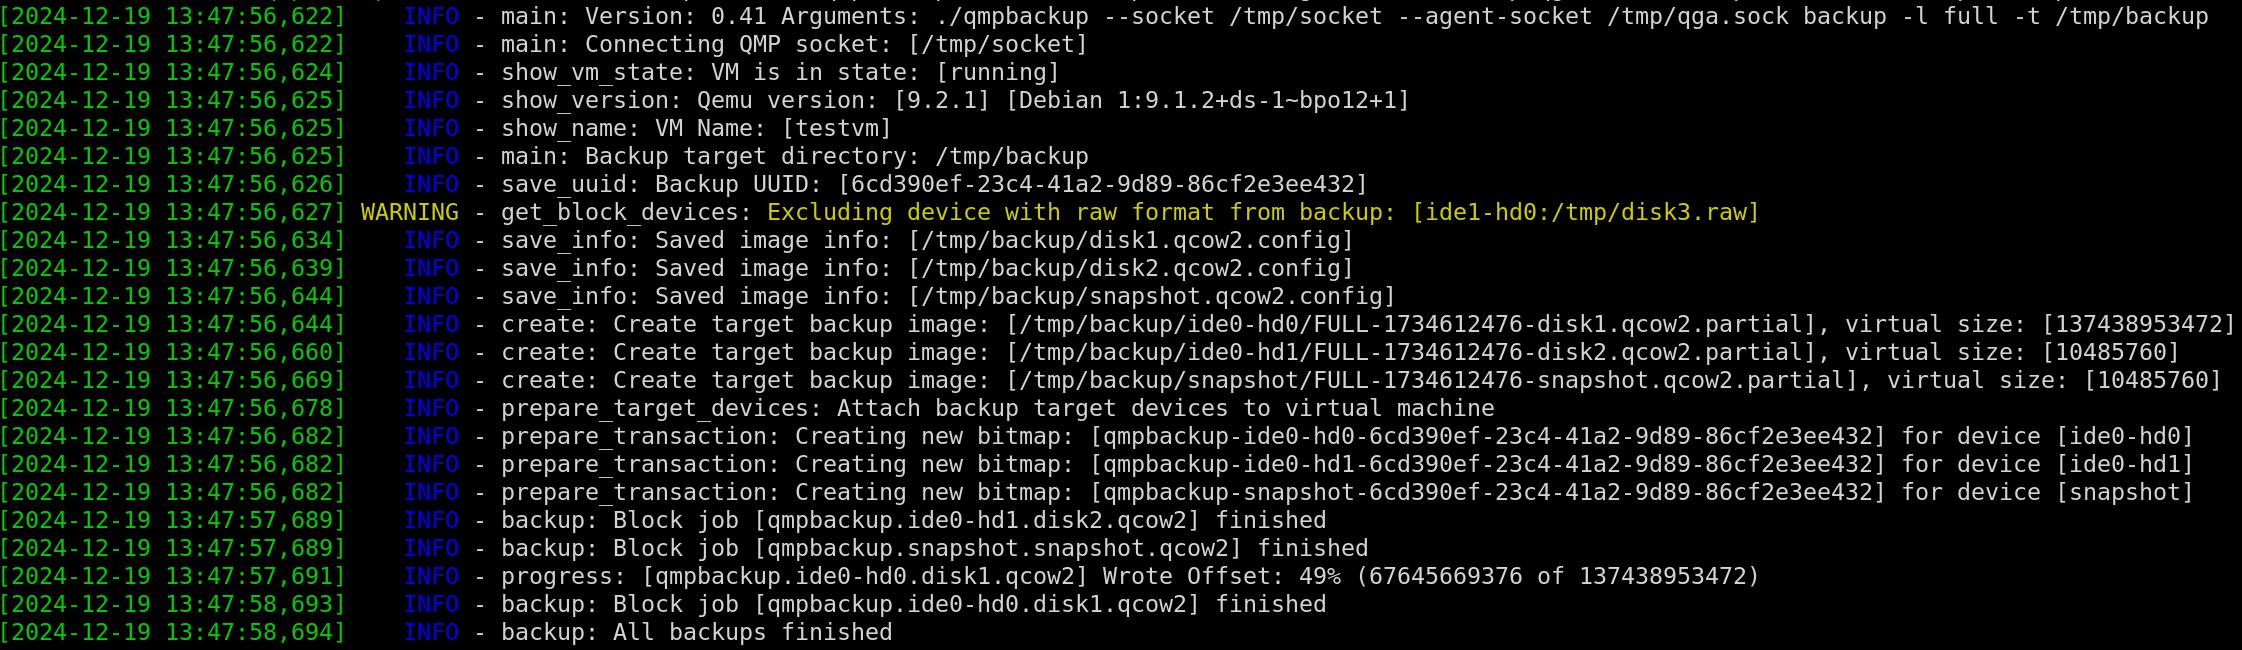
In order to create a full backup use the following command:
# remove already existent bitmaps from prior full backups:
 qmpbackup --socket /path/to/socket cleanup --remove-bitmaps
# create a new full backup to an empty directory:
 qmpbackup --socket /path/to/socket backup --level full --target /tmp/backup/
# example using a tcp endpoint:
 qmpbackup --socket tcp:localhost:4444  backup --level full --target /tmp/backup/
the command will create a new unique dirty bitmap and backup the virtual
machines disks to /tmp/backup/<disk-bus-id>/FULL-<timestamp>. It ensures
consistency by creating the bitmap and backup within one QMP transaction.
Multiple disks attached to the virtual machine are backed up concurrently.
During full and incremental backup, bitmaps will be created with persistent option flag. This means QEMU attempts to store them in the QCOW images, so
they are available between virtual machine shutdowns. The attached QCOW images
must be in qcow(v3) format, for this to work.
If you can't convert your QCOW images to newer formats, you still can use the
backup mode copy: it allows to execute a complete full backup but no further
incremental backups.
Second step is to change some data within your virtual machine and let
qmpbackup create an incremental backup for you, this works by:
qmpbackup --socket /path/to/socket backup --level inc --target /tmp/backup/
The changed delta since your last full (or inc) backup will be dumped to
/tmp/backup/<disk-bus-id>/INC-<timestamp>, the dirty-bitmap is automatically
cleared after this and you can continue creating further incremental backups by
re-issuing the command likewise.
There is also the auto backup level which combines the full and inc
backup levels. If there's no existing bitmap for the VM, full will run. If a
bitmap exists, inc will be used.
Backup
Backup chains / unique bitmap names
By default a new full backup to an empty directory will create a new unique id
for the bitmap that is used to start a new backup chain.
This way you can create multiple backup chains, each of them using an
unique bitmap to track the changes.
The qmpbackup utility will not cleanup those bitmaps by default if you can
cleanup bitmaps that are not required via:
 qmpbackup --socket /path/to/socket cleanup --remove-bitmaps
 qmpbackup --socket /path/to/socket cleanup --remove-bitmaps --uuid <uuid>
Alternatively you can specify the uuid to be used for the bitmap names during
the first full backup you create. This way the bitmaps will be reused and must
not be cleaned:
 qmpbackup --socket /path/to/socket backup -l full -t /tmp/backup --uuid testme
 qmpbackup --socket /path/to/socket backup -l inc -t /tmp/backup
Monthly Backups
Using the --monthly flag with the backup command, backups will be placed in
monthly folders in a YYYY-MM format. The above combined with the auto backup
level, backups will be created in monthly backup chains.
Executing the backup and the date being 2021-11, the following command:
qmpbackup --socket /path/to/socket backup --level auto --monthly --target /tmp/backup
will place backups in the following backup path: /tmp/backup/2021-11/
When the date changes to 2021-12 and qmpbackup is executed, backups will be
placed in /tmp/backup/2021-12/ and a new full backup will be created.
Excluding disks from backup
Disks can be excluded from the backup by using the --exclude option, the name
must match the devices "node" name (use the info --show blockdev option to
get a list of attached block devices considered for backup)
If only specific disks should be saved, use the --include option.
Filesystem Freeze
In case the virtual machine has an guest agent installed you can set the QEMU
Guest Agent socket (--agent-socket) and request filesystem quiesce via
--quiesce option:
qmpbackup --socket /path/to/socket --agent-socket /tmp/qga.sock backup --level full --target /tmp/ --quisce
Use the following options to QEMU to enable an guest agent socket:
   -chardev socket,path=/tmp/qga.sock,server,nowait,id=qga0 \
   -device virtio-serial \
   -device "virtserialport,chardev=qga0,name=org.qemu.guest_agent.0" \
It is recommended to enable filesystem freeze during backup to ensure
consistency.
If the operating system running within the virtual machine does not include
required agents and you need to ensure consistency, use the --pause option to
suspend the virtual machine during backup operation and resume afterwards.
Offline virtual machines
If you want to backup virtual machines without the virtual machine being in
fully operational state, it is sufficient to bring up the QEMU process in
prelaunch mode (The QEMU blocklayer is operational but no code is executed):
qemu-system-<arch> -S <options>
UEFI / BIOS (pflash devices)
If the virtual machine uses UEFI, it usually has attached pflash devices
pointing to the UEFI firmware and variables files. These will be included in
the backup by default.
Restore
Restoring your data is a matter of rebasing the created qcow images by using
standard tools such as qemu-img or qmprestore. There are three major
features implemented within the restore command: rebase, merge and
snapshotrebase.
The rebase and snapshotrebase commands will alter the directory
in-place: this means your backup files will be changed.
The merge functionality will merge the data into a separate, new qcow file
outside of your backup folder.
A image backup based on a backup folder containing the following backups:
/tmp/backup/ide0-hd0/
├── FULL-1706260639-disk1.qcow2
├── INC-1706260646-disk1.qcow2
└── INC-1706260647-disk1.qcow2
can be recovered the following ways:
Regular Rebase
A regular rebase will update the backing image for each backup file in-place:
qmprestore rebase --dir /tmp/backup/ide0-hd0
After rebase you will find an symlink /tmp/backup/image, which points to the
latest image to use with qemu or other tools.
Note: It makes sense to copy the existing backup directory to a temporary
folder before rebasing, if you do not want to alter your existing backups.
Using the --until option rollback to a specific incremental point in
time is possible:
qmprestore rebase --dir /tmp/backup/ide0-hd0 --until INC-1480542701
Rebase with commit
If you want to rebase and actually commit back the changes to the images use:
qmprestore commit --dir /tmp/backup/ide0-hd0
After rebase you will find the merged image file with all changes committed
in the target folder.
Note: It makes sense to copy the existing backup directory to a temporary
folder before rebasing, if you do not want to alter your existing backups.
Rebase into a new image
It is also possible to restore and rebase the backup files into a new target
file image, without altering the original backup files:
qmprestore merge --dir /tmp/backup/ide0-hd0/ --targetfile /tmp/restore/disk1.qcow2
Rebase with adding snapshots
Using the snapshotrebase functionality it is possible to rebase/commit the
images back into an full backup, but additionally the rebase process will
create an internal snapshot for the qemu image, for each incremental backup
applied.
This way it is easily possible to switch between the backup states after
rebasing.
 qmprestore snapshotrebase --dir /tmp/backup/ide0-hd0/
 [..]
 qemu-img snapshot -l /tmp/backup/ide0-hd0/FULL-1706260639-disk1.qcow2
 Snapshot list:
 ID        TAG               VM SIZE                DATE     VM CLOCK     ICOUNT
 1         FULL-BACKUP           0 B 2024-10-21 12:50:45 00:00:00.000          0
 2         2024-10-21-12:42:48      0 B 2024-10-22 09:23:39 00:00:00.000       0
 3         2024-10-21-12:42:49      0 B 2024-10-22 09:23:39 00:00:00.000       0
Misc commands and options
Compressing backups
The --compress option can be used to enable compression for target files
during the blockdev-backup operation. This can save quite some storage space on
the created target images, but may slow down the backup operation.
qmpbackup --socket /path/to/socket backup [..] --compress
List devices suitable for backup
qmpbackup --socket /path/to/socket info --show blockdev
Including raw devices (lvm, zfs, ceph)
Attached raw devices (format: raw) do not support incremental backup. The
only way to create backups for these devices is to create a complete full
or copy backup.
By default qmpbackup will ignore such devices, but you can use the
--include-raw option to create a backup for those devices "as is".
Metadata qcow files for raw devices (lvm, zfs, ceph)
A better solution is to use the qcow2 data-file setting that has been
introduced in later qemu versions. It allows to create metadata qcow images
that can store the persistent bitmap information, but the real data can reside
on any storage backend. This allows to use the full backup featureset.
As example, you can create a metadata qcow image like so:
 # point the data-file to a temporary file, as create will overwrite whatever it finds here
 qemu-img create -f qcow2 /vm1/metadata.qcow2 -o data_file=/tmp/TEMPFILE,data_file_raw=true ..
 rm -f /tmp/TEMPFILE
And then modify the image to point where the real data is provided (for example
a lvm device):
qemu-img amend /vm1/metadata.qcow2 -o data_file=/dev/lvm/vm1,data_file_raw=true
Now configure the metadata image /vm1/metadata.qcow2 as primary disk in your
qemu command call.
List existing bitmaps
To query existing bitmaps information use:
qmpbackup --socket /path/to/socket info --show bitmaps
Cleanup bitmaps
In order to remove existing dirty-bitmaps use:
qmpbackup --socket /path/to/socket cleanup --remove-bitmaps
If you create a new backup chain (new full backup to an empty
directory) you should cleanup old bitmaps before.
Speed limit
You can set an speed limit (bytes per second) for all backup operations to
limit throughput:
qmpbackup --socket /path/to/socket backup [..] --speed-limit 2000000
Hypervisors
Proxmox
To backup virtual machines running on Proxmox hypervisors it is recommended to
re-configure the virtual machines to provide a second dedicated qmp socket.
This can be done using the qm command.
First, show the command line that is used to start the vm (id 110 in this
example):
 qm stop 110
 qm showcmd 110
 /usr/bin/kvm -id 110 -name [..] -chardev 'socket,id=qmp,path=/var/run/qemu-server/110.qmp,server=on,wait=off'
Now add an additional command line parameter to the VM configuration:
 qm set 110 --args "-chardev 'socket,id=qmp-backup,path=/var/run/qemu-server/110-backup.qmp,server=on,wait=off' -mon 'chardev=qmp-backup,mode=control'"
 update VM 110: -args -chardev 'socket,id=qmp-backup,path=/var/run/qemu-server/110-backup.qmp,server=on,wait=off' -mon 'chardev=qmp-backup,mode=control'
 qm start 110
After the VM has started, a new qmp socket is available for backup:
 ls -ah /var/run/qemu-server/110-backup.qmp
 /var/run/qemu-server/110-backup.qmp
 qmpbackup --socket /var/run/qemu-server/110-backup.qmp backup  [..]
Limitations
Backing up libvirt virtual machines
Using the QMP protocol it cannot be used together with libvirt as libvirt
exclusively uses the virtual machines monitor socket. See
virtnbdbackup.
Backup target considerations
QEMUs drive-backup function does currently not support dumping data as a
stream, it also cannot work with fifo pipes as the blockdriver expects
functions like ftruncate and fseek to work on the target file, so the backup
target must be a directory.
TPM/SWTPM devices
Currently the utility will not handle backup of related (SW)TPM devices
attached to the virtual machine. A warning will be issued if such devices are
detected during backup.
External Snapshots
In case a external snapshot is created for certain devices, as in:
blockdev-add driver=qcow2 node-name=snap_1 file={"driver":"file","filename":"/mysnapshot.qcow2"}
blockdev-snapshot node=disk1 overlay=snap_1
the backup process will always backup the active snapshot device (the device
"snap_1"), not the original file it is based on.
Contributors
Showing top 2 contributors by commit count.


Related Repositories

restic/restic
Fast, secure, efficient backup program

MichaelCade/90DaysOfDevOps
This repository started out as a learning in public project for myself and has now become a structured learning map for many in the community. We have 3 years under our belt covering all things DevOps, including Principles, Processes, Tooling and Use Cases surrounding this vast topic.

duplicati/duplicati
Store securely encrypted backups in the cloud!

kopia/kopia
Cross-platform backup tool for Windows, macOS & Linux with fast, incremental backups, client-side end-to-end encryption, compression and data deduplication. CLI and GUI included.

borgbackup/borg
Deduplicating archiver with compression and authenticated encryption.

velero-io/velero
Backup and migrate Kubernetes applications and their persistent volumes