Ov
🎑Feature-rich terminal-based text viewer. It is a so-called terminal pager.
* 1. [Feature](#feature) * 1.1. [Not supported](#not-supported) * 2. [Install](#install) * 2.1. [deb package](#deb-package) * 2.2. [rpm package](#rpm-package) * 2.3. [MacPorts (macOS)](#macports-(macos)) * 2.4. [Homebrew(macOS or Linux)](#homebrew(macos-or-linux)) * 2.5. [winget(windows)](#winget(windows)) * 2.6. [pkg (FreeBSD)](#pkg-(freebsd)) * 2.7. [Arch Linux](#arch-linux) * 2.8. [nix (nixOS, Linux, or macOS)](#nix-(nixos,-linux,-or-macos)) * 2.9. [Binary](#binary) * 2.10. [go install](#go-i... The project is written primarily in Go, distributed under the MIT License license, first published in 2020. It has gained significant community traction with 1,956 stars and 43 forks on GitHub. Key topics include: cli, command-line, command-line-tool, go, golang.
ov - feature rich terminal pager
<!-- markdownlint-disable MD019 MD029 MD033 MD036 MD060 -->

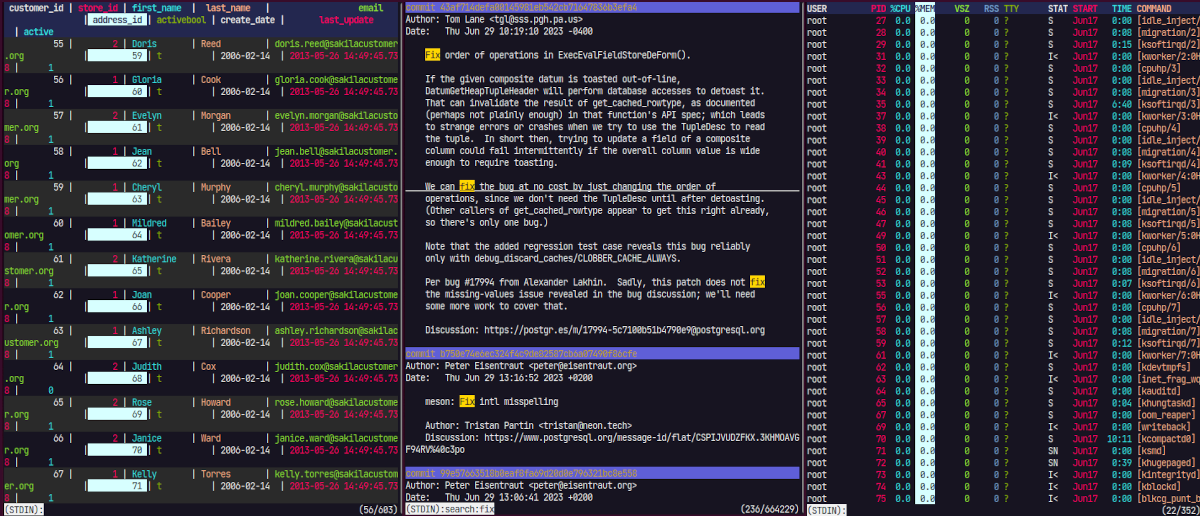
ov is a terminal pager.
-
- 1.1. Not supported
-
- 2.1. deb package
- 2.2. rpm package
- 2.3. MacPorts (macOS)
- 2.4. Homebrew(macOS or Linux)
- 2.5. winget(windows)
- 2.6. pkg (FreeBSD)
- 2.7. Arch Linux
- 2.8. nix (nixOS, Linux, or macOS)
- 2.9. Binary
- 2.10. go install
- 2.11. Build from source
- 2.12. Completion
- 2.12.1. bash
- 2.12.2. zsh
- 2.12.3. fish
- 2.12.4. powershell
-
- 4.1. Config
- 4.2. Header
- 4.2.1. Skip
- 4.3. Vertical Header
- 4.4. Column mode
- 4.5. Header Column
- 4.6. Column rainbow mode
- 4.7. Column width
- 4.8. Wrap
- 4.8.1. word wrap mode
- 4.9. Alternate-Rows
- 4.10. Sidebar
- 4.11. Section
- 4.11.1. section example
- 4.11.2. hide other sections
- 4.12. Multiple files
- 4.13. Follow mode
- 4.13.1. Follow name
- 4.13.2. Follow all mode
- 4.13.3. Follow section mode
- 4.13.4. Sticky Follow
- 4.14. Exec mode
- 4.15. Search
- 4.16. Caption
- 4.17. Mark
- 4.17.1. mark by pattern
- 4.17.2. Specifying a mark
- 4.18. Watch
- 4.19. Mouse support
- 4.19.1. Text Selection
- 4.19.2. Wheel scroll
- 4.19.3. Scroll Amount Configuration
- 4.19.4. Anchor and Extend Selection
- 4.20. Multi color highlight
- 4.21. Plain
- 4.22. Converter
- 4.23. Align
- 4.23.1. Shrink
- 4.23.2. Right Align
- 4.24. Jump target
- 4.25. View mode
- 4.25.1. View Mode Sidebar
- 4.25.2. List View Modes
- 4.26. Output on exit
- 4.27. Quit if one screen
- 4.28. Suspend
- 4.29. Edit
- 4.30. Save
- 4.31. Ruler
- 4.32. Redirect Output
-
- 8.1. Style customization
- 8.1.1. UnderlineStyle
- 8.2. Customizing the bottom status line
- 8.3. Terminal Title
- 8.3.1. Command line usage
- 8.3.2. Configuration file
- 8.3.3. Custom terminal title
- 8.4. Help and Log Documentation customization
- 8.5. Key binding customization
- 8.6. General configuration
- 8.1. Style customization
1. <a name='feature'></a>Feature
- Quickly opens files larger than memory.
- Supports fixed header lines and columns.
- Optimized for tabular text with column mode and customizable column colors.
- Fully customizable shortcut keys and styles.
- Follow mode for real-time updates (like
tail -f/tail -F). - Exec mode to display command output dynamically.
- Watch mode to monitor file changes periodically.
- Advanced search: incremental, regex, and filter functions.
- Multi-color highlighting for multiple words.
- Supports Unicode and East Asian Width characters.
- Handles compressed files (gzip, bzip2, zstd, lz4, xz).
1.1. <a name='not-supported'></a>Not supported
- Does not support syntax highlighting for file types (source code, markdown, etc.)
2. <a name='install'></a>Install
2.1. <a name='deb-package'></a>deb package
You can download the package from releases.
consolecurl -L -O https://github.com/noborus/ov/releases/download/vx.x.x/ov_x.x.x-1_amd64.deb sudo dpkg -i ov_x.x.x-1_amd64.deb
2.2. <a name='rpm-package'></a>rpm package
You can download the package from releases.
consolesudo rpm -ivh https://github.com/noborus/ov/releases/download/vx.x.x/ov_x.x.x-1_amd64.rpm
2.3. <a name='macports-(macos)'></a>MacPorts (macOS)
consolesudo port install ov
2.4. <a name='homebrew(macos-or-linux)'></a>Homebrew(macOS or Linux)
consolebrew install ov
2.5. <a name='winget(windows)'></a>winget(windows)
consolewinget install -e --id noborus.ov
2.6. <a name='pkg-(freebsd)'></a>pkg (FreeBSD)
consolepkg install ov
2.7. <a name='arch-linux'></a>Arch Linux
You can install ov using an AUR helper.
Choose an AUR package:
- https://aur.archlinux.org/packages/ov (build and install from latest stable source)
- https://aur.archlinux.org/packages/ov-bin (install pre-compiled binary)
- https://aur.archlinux.org/packages/ov-git (build and install from latest git commit)
2.8. <a name='nix-(nixos,-linux,-or-macos)'></a>nix (nixOS, Linux, or macOS)
ov is available as a nix package. You can install it with
consolenix profile install nixpkgs#ov
if you use flakes, or using nix-env otherwise:
consolenix-env -iA nixpkgs.ov
2.9. <a name='binary'></a>Binary
You can download the binary from releases.
consolecurl -L -O https://github.com/noborus/ov/releases/download/vx.x.x/ov_x.x.x_linux_amd64.zip unzip ov_x.x.x_linux_amd64.zip sudo install ov /usr/local/bin
2.10. <a name='go-install'></a>go install
It will be installed in $GOPATH/bin by the following command.
consolego install github.com/noborus/ov@latest
Or to install the latest commit from master:
consolego install github.com/noborus/ov@master
2.11. <a name='build-from-source'></a>Build from source
First of all, clone this repo with either git clone or gh repo clone, then cd to the directory, for example:
consolegit clone https://github.com/noborus/ov.git cd ov
Next, to install to $GOPATH/bin, run the make install command.
consolemake install
Or, install it in a PATH location for other users to use
(For example, in /usr/local/bin).
consolemake sudo install ov /usr/local/bin
2.12. <a name='completion'></a>Completion
You can generate completion scripts for bash, zsh, fish, and powershell.
2.12.1. <a name='bash'></a>bash
consoleov --completion bash > /etc/bash_completion.d/ov
2.12.2. <a name='zsh'></a>zsh
consoleov --completion zsh > /usr/share/zsh/site-functions/_ov
For zinit users.
consolezinit load 'https://github.com/noborus/ov/blob/master/ov.plugin.zsh'
2.12.3. <a name='fish'></a>fish
consoleov --completion fish > ~/.config/fish/completions/ov.fish
2.12.4. <a name='powershell'></a>powershell
consoleov --completion powershell | Out-String | Invoke-Expression
3. <a name='basic-usage'></a>Basic usage
ov supports open file name or standard input.
consoleov filename
consolecat filename|ov
You can also explicitly specify standard input as -.
consolecat filename | ov -
Used by other commands by setting the environment variable PAGER.
consoleexport PAGER=ov
4. <a name='usage'></a>Usage
See the ov site for more use cases and examples.
[!NOTE]
(default keykey) indicates the key that can be specified even after starting the same function as the command line option.
4.1. <a name='config'></a>Config
You can set style and key bindings in the configuration file.
ov will look for a configuration file in the following paths in descending order:
filepath$XDG_CONFIG_HOME/ov/config.yaml $HOME/.config/ov/config.yaml $HOME/.ov.yaml
On Windows:
filepath%USERPROFILE%/.config/ov/config.yaml %USERPROFILE%/.ov.yaml
Create a config.yaml file in one of the above directories. If the file is in the user home directory, it should be named .ov.yaml.
v0.53.0 and later
You can generate a default configuration with:
consoleov --generate-config > ~/.config/ov/config.yaml
On Windows (PowerShell):
powershellov --generate-config > $env:USERPROFILE/.config/ov/config.yaml
[!NOTE]
If you likelesskey bindings, generate it with--generate-config=less.
consoleov --generate-config=less > ~/.config/ov/config.yaml
4.2. <a name='header'></a>Header
The --header (-H) (default key H) option fixedly displays the specified number of lines.
consoleov --header 1 README.md
Related styling: Header and HeaderBorder.
4.2.1. <a name='skip'></a>Skip
When used with the --skip-lines (default key Ctrl+s) option, it hides the number of lines specified by skip and then displays the header.
consoleov --skip-lines 1 --header 1 README.md
4.3. <a name='vertical-header'></a>Vertical Header
The --vertical-header (-y) (default key y) option fixedly displays the specified number of characters.
consoleov --vertical-header=4 README.md
If you want to specify by column instead of character, see Header Column.
Related styling: VerticalHeader and VerticalHeaderBorder.
4.4. <a name='column-mode'></a>Column mode
Specify the delimiter with --column-delimiter(default key is d) and set it to --column-mode(default key is c) to highlight the column.
consoleov --column-delimiter "," --column-mode test.csv
Regular expressions can be used for the --column-delimiter.
Enclose in '/' when using regular expressions.
[!TIP]
Use regex delimiters like/\s+/for variable whitespace or/[,;]/for multiple delimiter characters.
consoleps aux | ov -H1 --column-delimiter "/\s+/" --column-rainbow --column-mode
Related styling: ColumnHighlight,ColumnRainbow.
4.5. <a name='header-column'></a>Header Column
The --header-column (-Y) (default key is Y) option fixedly displays the specified number of columns when column-mode is enabled.
consoleov --column-mode --column-delimiter="," --header-column=2 test.csv
When in column-mode, pressing F will switch to fixed display for the selected columns up to that point.
Related styling: VerticalHeader and VerticalHeaderBorder.
4.6. <a name='column-rainbow-mode'></a>Column rainbow mode
You can also color each column individually in column mode.
Specify --column-rainbow(default key is Ctrl+r) in addition to the --column-mode option.
Color customization is possible. Please specify 7 or more colors in config.yaml.
yamlStyle: ColumnRainbow: - Foreground: "white" - Foreground: "aqua" - Foreground: "lightsalmon" - Foreground: "lime" - Foreground: "blue" - Foreground: "yellowgreen" - Foreground: "red"
Style specifications other than Foreground can also be specified.
yamlStyle: ColumnRainbow: - Foreground: "white" Background: "red" - Foreground: "aqua" Underline: true - Foreground: "#ff7f00" Background: "blue" Bold: true - Foreground: "lime" Italic: true - Foreground: "blue" Dim: true - Foreground: "yellowgreen" - Foreground: "red"
Related styling: ColumnRainbow.
4.7. <a name='column-width'></a>Column width
The --column-width option is designed for command output with irregular spaces, such as ps aux, df, etc. (default key Alt+o).
It automatically detects and separates columns without needing a specific delimiter.
consoleps aux|ov -H1 --column-width --column-rainbow
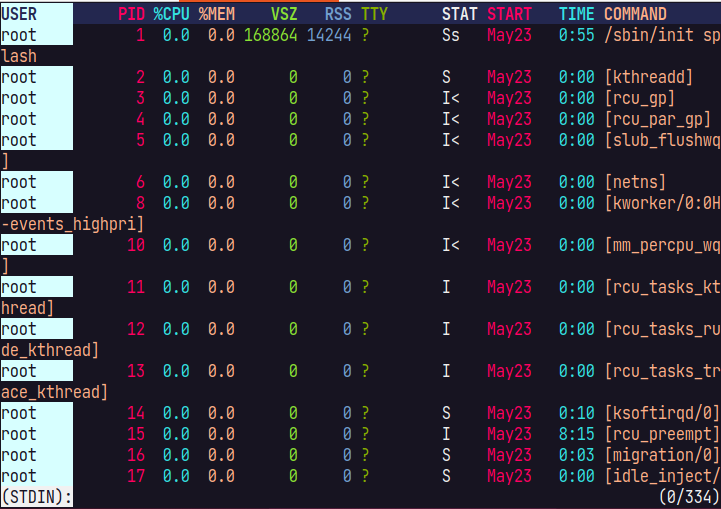
This column-width feature is implemented using guesswidth.
4.8. <a name='wrap'></a>Wrap
Supports switching between wrapping and not wrapping lines.
The option is --wrap, specify --wrap=false (default key w, W) if you do not want to wrap.
4.8.1. <a name='word-wrap-mode'></a>word wrap mode
Added in v0.52.0
Word wrap has been added and the method of specification has changed.
-wor-w=char(default): Wrap lines at screen width, breaking anywhere.-w=word: Wrap lines at screen width, breaking at word boundaries.-w=none: Disable line wrapping.
Toggle word wrap with default key Alt+w.
4.9. <a name='alternate-rows'></a>Alternate-Rows
Alternate row styles with the --alternate-rows(-C) (default key C) option
The style can be set with Style customization.
consoleov --alternate-rows test.csv
Related styling: Alternate.
4.10. <a name='sidebar'></a>Sidebar
Added in v0.51.0
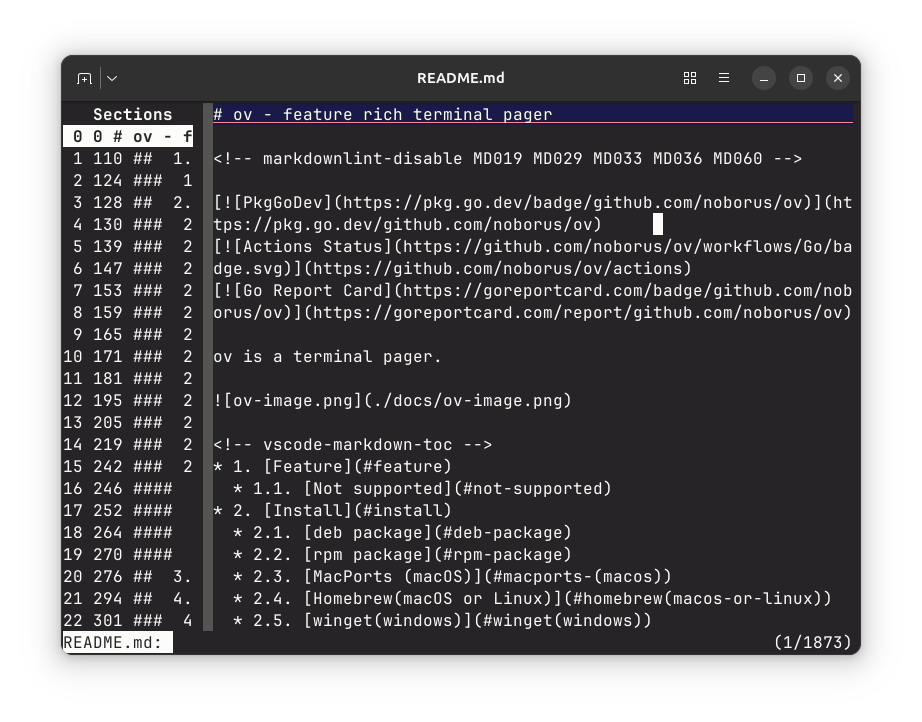
ov now supports a sidebar feature, allowing you to display additional information alongside the main content.
The sidebar can show:
- Help (default key
Alt + h) - Mark list (default key
Alt + m) - Document list (default key
Alt + l) - Section list (default key
Alt + u)
You can toggle the sidebar and switch its mode using keyboard shortcuts or configuration options. The sidebar width is configurable, and its content updates dynamically according to the current mode.
Sidebar scrolling is independent of the main content.
Default keys are:
- up(default key
shift+up) - down(default key
shift+down) - left(default key
shift+left) - right(default key
shift+right)
You can also specify the sidebar mode via CLI or config(help, marks, documents, sections).
consoleov --sidebar-mode=sections --section-delimiter "^#" README.md
You can specify the initial sidebar mode via CLI with --sidebar-mode=string or by setting it in the config file.
You can set the sidebar width using SidebarWidth. This can be specified as a percentage (e.g., 20%) or as a fixed width in columns (e.g., 30).
Example:
yamlSidebarMode: "marks" # Initial sidebar mode (help, marks, documents, sections) SidebarWidth: 30 # Width of the sidebar. Can be specified in percentage or fixed width (e.g., "30" for 30 columns).
4.11. <a name='section'></a>Section
You can specify a section delimiter using --section-delimiter (default key Alt+d).
This allows you to move between sections (default keys space and ^).
The specified line will also be treated as a section header and will remain fixed at the specified position until the next section appears at the specified position.
The start of the section can be adjusted with --section-start(default key Ctrl+F3, Alt+s).
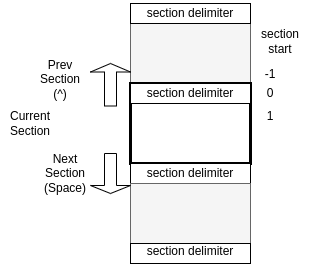
The --section-delimiter is written in a regular expression (for example: "^#").
(Line breaks are not included in matching lines).
For example, if you specify "^diff" for a diff that contains multiple files,
you can move the diff for each file.
The number of lines in section-header can be changed.
You can specify the number of lines using the --section-header-num option or key input(default key F7).
The specified section can be viewed in the section list in the Sidebar(default key Alt+u).
4.11.1. <a name='section-example'></a>section example
This is an example of using the git pager.
gitconfig[pager] diff = "ov -F --section-delimiter '^diff'" log = "ov -F --section-delimiter '^commit' --section-header-num 3"
Related styling: SectionLine.
4.11.2. <a name='hide-other-sections'></a>hide other sections
If you specify --hide-other-section(default key Alt+-), only the current section is displayed.
consoleov --section-delimiter "^#" --hide-other-section README.md
This is just hidden, so it will be displayed when you move to the next section.
4.12. <a name='multiple-files'></a>Multiple files
ov can also open multiple files.
consoleov file1 file2
You can include standard input in the file list by specifying -.
consolecommand | ov - file1 file2
Multiple files are each opened as a document and can be navigated using the Next Document ] key (default), Previous Document [ key (default).
Specified multiple files can also be displayed in the document list in the Sidebar(default key alt + l).
Related Styling: Customizing the bottom status line.
4.13. <a name='follow-mode'></a>Follow mode
--follow(-f)(default key Ctrl+f) prints appended data and moves to the bottom line (like tail -f).
consoleov --follow-mode /var/log/syslog
console(while :; do echo random-$RANDOM; sleep 0.1; done;)|./ov --follow-mode
4.13.1. <a name='follow-name'></a>Follow name
[!TIP]
Use--follow-nameinstead of--follow-modewhen files might be rotated (like log files). This ensures you continue following the new file even if the original is moved or deleted.
You can specify the file name to follow with --follow-name(like tail -F).
Monitor file names instead of file descriptors.
consoleov --follow-name /var/log/nginx/access.log
4.13.2. <a name='follow-all-mode'></a>Follow all mode
--follow-all(-A)(default key Ctrl+a) is the same as follow mode, it switches to the last updated file if there are multiple files.
consoleov --follow-all /var/log/nginx/access.log /var/log/nginx/error.log
4.13.3. <a name='follow-section-mode'></a>Follow section mode
Use the --follow-section(default key F2) option to follow by section.
Follow mode is line-by-line, while follow section mode is section-by-section.
Follow section mode displays the bottom section.
The following example is displayed from the header (#) at the bottom.
consoleov --section-delimiter "^#" --follow-section README.md
[!NOTE]
Watch mode is a mode in which--follow-sectionand--section-delimiter "^\f"are automatically set.
4.13.4. <a name='sticky-follow'></a>Sticky Follow
Follow mode uses Sticky follow by default. In Sticky follow mode, when you move up from the bottom, follow mode temporarily pauses. Follow mode resumes automatically when you return to the bottom of the file.
This behavior allows you to:
- Scroll up to examine previous content without losing your position
- Automatically resume following new content when you return to the bottom
- Maintain context while monitoring live files
Visual Indicators:
When follow mode is paused, you'll see visual indicators to help you understand the current state:
||appears at the beginning of the status line to indicate that follow mode is paused- The line where follow mode was paused is highlighted with the
PauseLinestyle
You can disable Sticky follow by setting DisableStickyFollow: true in your configuration file:
yamlGeneral: DisableStickyFollow: true
Related styling: PauseLine.
4.14. <a name='exec-mode'></a>Exec mode
Exec mode captures the output of a command and displays it in ov.
It works similarly to watch, but with advanced paging features.
Use the --exec (-e) option to run the command and display stdout/stderr separately.
[!TIP]
When using--exec, you must insert--to separate ov's options from the command you want to run.
Everything after--is interpreted as the command and its arguments.
consoleov --exec -- ls -l
Shows the stderr screen as soon as an error occurs, when used with --follow-all.
consoleov --follow-all --exec -- make
In exec mode (other than Windows) the output is opened by opening a pty.
Therefore, the command is likely to be printed in color.
consoleov --exec -- eza -l
It is useful to use the --notify-eof option together with exec mode to get notified when the command finishes.
This is especially helpful for long-running commands like make.
consoleov --notify-eof --exec -- make
4.15. <a name='search'></a>Search
Search by forward search / key(default) or the backward search ? key(default).
Search can be toggled between incremental search, regular expression search, and case sensitivity.
Displayed when the following are enabled in the search input prompt:
| Function | display | (Default)key | command option | config file |
|---|---|---|---|---|
| Incremental search | (I) | Alt+i | --incremental | Incsearch |
| Regular expression search | (R) | Alt+r | --regexp-search | RegexpSearch |
| Case-sensitive | (Aa) | Alt+c | -i, --case-sensitive | CaseSensitive |
| Smart case-sensitive | (S) | Alt+s | --smart-case-sensitive | SmartCaseSensitive |
Specify true/false in config file.
configCaseSensitive: false RegexpSearch: false Incsearch: true SmartCaseSensitive: true
Related styling: SearchHighlight
4.15.1. <a name='pattern'></a>Pattern
The pattern option allows you to specify a search at startup.
consoleov --pattern install README.md
4.15.2. <a name='filter'></a>Filter
Filter input is possible using the & key(default).
The filter input creates a new document only for the lines that match the filter.
Move next document ] and previous document [ key(default) allow you to move between the filter document and the original document.
The K(shift+k) key (default) closes all documents created by the filter.
You can also specify a filter using the command line option --filter.
consoleov --filter "install" README.md
The filter is a regular expression.
consoleov --filter "^#" README.md
You can also filter for lines that do not match the specified pattern.
If you press ! on & while inputting a filter, non-matching lines will be targeted.
The command line option for this can be specified with --non-match-filter.
consoleov --non-match-filter info /var/log/syslog
If you specify both a filter option and the Quit if one screen option,
the command will display the results of the filter and then quit if the results fit on one screen.
console$ ps aux|ov -H1 --filter postgres --quit-if-one-screen USER PID %CPU %MEM VSZ RSS TTY STAT START TIME COMMAND postgres 1589 0.0 0.0 221992 29952 ? Ss Jul24 0:02 /usr/lib/postgresql/14/bin/postgres -D /var/lib/postgresql/14/main -c config_file=/etc/postgresql/14/main/postgresql.conf postgres 1624 0.0 0.0 222104 9544 ? Ss Jul24 0:00 postgres: 14/main: checkpointer postgres 1626 0.0 0.0 221992 8392 ? Ss Jul24 0:00 postgres: 14/main: background writer postgres 1627 0.0 0.0 221992 11464 ? Ss Jul24 0:00 postgres: 14/main: walwriter postgres 1628 0.0 0.0 222560 9928 ? Ss Jul24 0:01 postgres: 14/main: autovacuum launcher postgres 1629 0.0 0.0 76728 7112 ? Ss Jul24 0:01 postgres: 14/main: stats collector postgres 1631 0.0 0.0 222420 8904 ? Ss Jul24 0:00 postgres: 14/main: logical replication launcher noborus 193766 0.0 0.0 1603756 7552 pts/0 Rl+ 10:37 0:00 ov -H1 -F --filter postgres
4.16. <a name='caption'></a>Caption
You can specify a caption instead of the file name in status line to display it.
consolels -alF|ov --caption "ls -alF"
It can also be specified as an environment variable.
consoleexport OV_CAPTION="ls -alF" ls -alF|ov
4.17. <a name='mark'></a>Mark
Mark the display position with the m key(default).
The mark is decorated with MarkLine and MarkStyleWidth.
Marks can be erased individually with the M key(default).
It is also possible to delete all marks with the ctrl + delete key(default).
The specified marks can be displayed in the mark list in the Sidebar(default key alt + m).
Related styling: MarkLine.
4.17.1. <a name='mark-by-pattern'></a>mark by pattern
You can use mark by pattern to mark all lines that match the search(default key *).
This will enter pattern input mode and, when you press Enter, mark all lines
that match the pattern.
4.17.2. <a name='specifying-a-mark'></a>Specifying a mark
Use the >next and <previous (default) key to move to the marked position.
You can also enter mark specify mode with , (default) and select a mark by
number. There are two input styles: enter the number directly, or enter a
relative offset like +N/-N from the current mark. When you press ,, the
mark list sidebar opens automatically along with number input mode.
4.18. <a name='watch'></a>Watch
ov has a watch mode that reads the file every N seconds and adds it to the end.
When you reach EOF, add '\f' instead.
Use the --watch(-T) option.
Go further to the last section.
The default is'section-delimiter', so the last loaded content is displayed.
for example.
consoleov --watch 1 /proc/meminfo
4.19. <a name='mouse-support'></a>Mouse support
The ov makes the mouse support its control.
This can be disabled with the option --disable-mouse (default keys for toggling mouse support are Ctrl+Alt+r).
If mouse support is enabled, tabs and line breaks will be interpreted correctly when copying.
If your terminal supports OSC52, it is recommended to use OSC52 for clipboard operations(default).
Set ClipboardMethod to OSC52 in the configuration file (config.yaml):
[!TIP]
UseOSC52method if you're working over SSH or in terminal multiplexers like tmux/screen where traditional clipboard tools might not work.
yamlClipboardMethod: "OSC52"
This method is useful in environments where OSC52 is supported by the terminal.
If your terminal does not support OSC52, or if you do not want to use OSC52,
set ClipboardMethod to system to use atotto/clipboard
for clipboard operations.
In Linux/Unix environments, this requires the xclip or xsel command.
yamlClipboardMethod: "system"
Selecting the range with the mouse and then left-clicking will copy it to the clipboard.
Pasting in ov is done with the middle button.
In other applications, it is pasted from the clipboard (often by pressing the right-click).
4.19.1. <a name='text-selection'></a>Text Selection
The mouse supports intelligent text selection for improved productivity:
- Single click: Place cursor and start text selection by dragging
- Double click: Select the word under the cursor
- Triple click: Select the entire line under the cursor
These selection methods work seamlessly with the clipboard functionality. After making a selection with double or triple click, the selected text is automatically copied to the clipboard.
4.19.2. <a name='wheel-scroll'></a>Wheel scroll
When mouse support is enabled, you can use the mouse wheel for navigation:
- Vertical scrolling: Use the mouse wheel to scroll up and down
- Horizontal scrolling: Use
Shift + wheelto scroll left and right
4.19.3. <a name='scroll-amount-configuration'></a>Scroll Amount Configuration
You can customize the scroll amounts using command-line options or configuration file settings:
4.19.4. <a name='anchor-and-extend-selection'></a>Anchor and Extend Selection
Added in v0.50.0
You can now use "Anchor and Extend Selection" with the mouse:
- Set Anchor: Left-click to set an anchor point.
- Extend Selection: After setting an anchor, use
Alt+Clickor right-click to extend the selection from the anchor to the clicked position and copy the selected range. - Clear Anchor: If no selection is created, double-click will clear the anchor.
- Anchor Highlight: When there is no selection, the anchor point is visually highlighted (reverse style).
This feature enables flexible, editor-like selection and copy operations using the mouse.
Vertical Scroll Amount:
- Command-line: Not directly configurable (uses system default)
- Config file: Set
VScrollLinesin theGeneralsection
yamlGeneral: VScrollLines: 3
Horizontal Scroll Amount:
Command-line: --hscroll-width (e.g., --hscroll-width "20%" or --hscroll-width "10")
Config file: Set HScrollWidth in the General section
yamlGeneral: HScrollWidth: "10%" # Percentage of screen width # or HScrollWidth: "20" # Specific number of columns
4.20. <a name='multi-color-highlight'></a>Multi color highlight
This feature styles multiple words individually.
.key(default) enters multi-word input mode.
Enter multiple words (regular expressions) separated by spaces.
For example, error info warn debug will color errors red, info cyan, warn yellow, and debug magenta.
It can also be specified with the command line option --multi-color(-M)(default key .).
For command line options, pass them separated by ,(comma).
For example:
consoleov --multi-color "ERROR,WARN,INFO,DEBUG,not,^.{24}" access.log
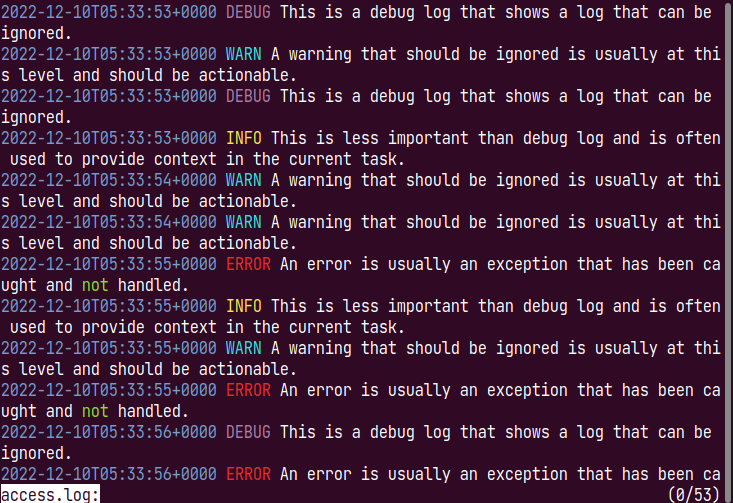
Color customization is possible. Please specify 7 or more colors in config.yaml.
yamlStyle: MultiColorHighlight: - Foreground: "red" Reverse: true - Foreground: "aqua" Underline: true - Foreground: "yellow" Background: "blue" - Foreground: "fuchsia" - Foreground: "lime" - Foreground: "blue" - Foreground: "#c0c0c0"
Related styling: MultiColorHighlight.
4.21. <a name='plain'></a>Plain
Supports disable decoration ANSI escape sequences.
The option is --plain (or -p) (default key Ctrl+e).
4.22. <a name='converter'></a>Converter
Converter selects the engine to convert and display the text.
Usually, the escape sequence is interpreted and displayed by es (default).
raw displays as it is without interpreting the escape sequence.
You can specify the --converter option with [es|raw|align],
and you can also specify the --raw, --align(Align) option as a shortcut option.
[!NOTE]
rawalso displays the character string of the escape sequence,
but be aware that Plain hides the decoration after interpreting the escape sequence.
4.23. <a name='align'></a>Align
The --align option adjusts column widths to improve readability for irregularly formatted tabular data, such as CSV files with misaligned columns.
Example:
consoleov --column-mode --align test.csv
csvc1,c2,c3 a,b,c aaaaaaaaaaaaaaaaaaaa,bb,cc aa,bbbbbbbbbbbbbb,cc aa,bb,cccccccccccccccccccccc
After applying --align:

Align can also shrink column.
4.23.1. <a name='shrink'></a>Shrink
Align allows columns to be shrunk and stretched by toggling with the (default key s).
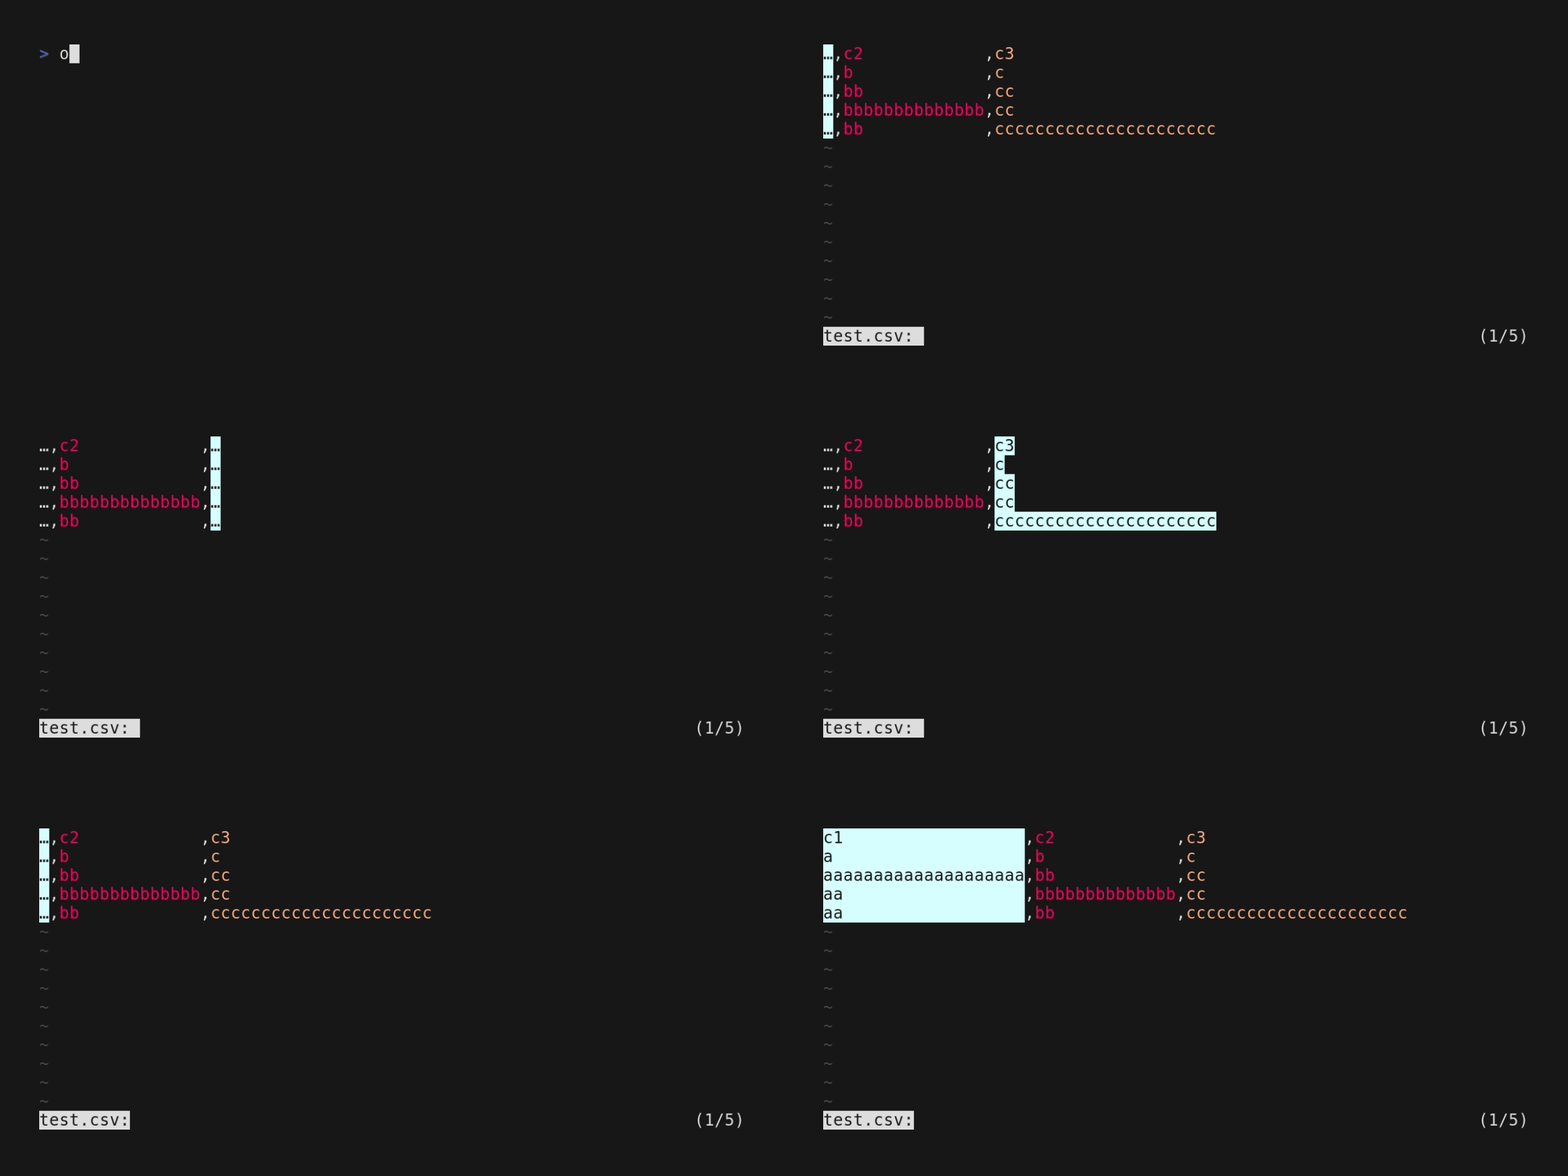
To change the character displayed when columns are shrunk, set ShrinkChar in the configuration file:
yamlShrinkChar: '.'
4.23.2. <a name='right-align'></a>Right Align
Columns displayed by alignment are left-justified. Columns can be right-aligned (default key Alt+a).
4.24. <a name='jump-target'></a>Jump target
You can specify the lines to be displayed in the search results.
This function is similar to --jump-target of less.
Positive numbers are displayed downwards by the number of lines from the top(1).
Negative numbers are displayed up by the number of lines from the bottom(-1).
. (dot) can be used to specify a percentage. .5 is the middle of the screen(.5).
You can also specify a percentage, such as (50%).
This option can be specified with --jump-target(or -j) (default key j).
If section is specified as the --jump-target, the display will start from the beginning of the section as much as possible
and the jump-target will be changed.
consoleov --section-delimiter "^#" --jump-target section README.md
Related styling: JumpTarget.
4.25. <a name='view-mode'></a>View mode
You can also use a combination of modes using the --view-mode(default key p) option.
In that case, you can set it in advance and specify the combined mode at once.
For example, if you write the following settings in ov.yaml,
the csv mode will be set with --view-mode csv.
consoleov --view-mode csv test.csv
ovMode: p: Header: 2 AlternateRows: true ColumnMode: true LineNumMode: false Wrap: "character" ColumnDelimiter: "|" ColumnRainbow: true m: Header: 3 AlternateRows: true ColumnMode: true LineNumMode: false Wrap: "character" ColumnDelimiter: "|" csv: Header: 1 AlternateRows: true ColumnMode: true LineNumMode: false Wrap: "character" ColumnDelimiter: "," ColumnRainbow: true
4.25.1. <a name='view-mode-sidebar'></a>View Mode Sidebar
Added in v0.52.0
When you press p to enter view mode selection, a sidebar automatically opens and displays the list of available view modes with their index numbers. You can select a mode either by name or by its number.
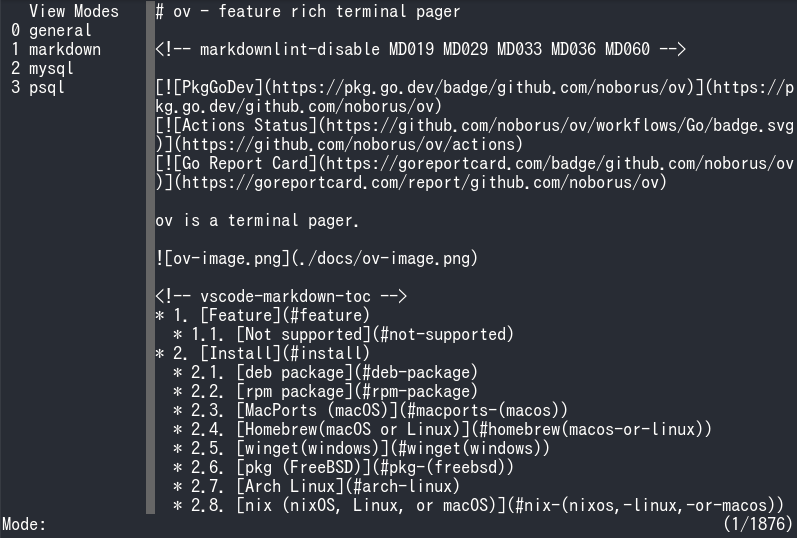
4.25.2. <a name='list-view-modes'></a>List View Modes
The --list-view-modes option outputs a list of available view modes defined in the configuration file.
shov --config ov.yaml --list-view-modes
Example output:
plaintextgeneral markdown mysql psql
This is useful for checking predefined view modes and their configurations.
4.26. <a name='output-on-exit'></a>Output on exit
--exit-write, -X(default key Q) option prints the current screen on exit.
This looks like the display remains on the console after the ov is over.
By default, it outputs the amount of the displayed screen with all decorations, such as search highlights, as it appears on the screen.
consoleov -X README.md
If you want to revert to the previous behavior (outputting the original text without decorations), set IsWriteOriginal: true in the configuration file.
yamlIsWriteOriginal: true
You can change how much is written using --exit-write-before and --exit-write-after(default key Ctrl+q).
--exit-write-before
--exit-write-before specifies the number of lines before the current position(top of screen).
--exit-write-before 3 will output from 3 lines before.
--exit-write-after specifies the number of lines after the current position (top of screen).
--exit-write-before 3 --exit-write-after 3 outputs 6 lines.
4.27. <a name='quit-if-one-screen'></a>Quit if one screen
The --quit-if-one-screen, -F option allows the program to exit immediately if the content fits within one screen.
This can be useful when you only want to view small files or when you want to quickly check the content without scrolling.
If you want to enable this option by default, set QuitSmall to true in the configuration file.
yamlQuitSmall: true
4.28. <a name='suspend'></a>Suspend
You can suspend ov with Ctrl+z(default key).
Normally, you can resume from suspend by typing fg.
consolesuspended ov (use 'fg' to resume)
On Windows or if the environment variable OV_SUBSHELL is set, exit instead of fg.
The process actually starts a subshell without suspending.
consolesuspended ov (use 'exit' to resume)
4.29. <a name='edit'></a>Edit
You can edit the currently displayed file with your preferred editor by pressing the default key Alt+v.
If the file is not a regular file (for example, when viewing input from a pipe or standard input), a temporary file is created and passed to the editor for editing. This ensures that you can still edit the content even if the original input is not seekable.
The editor command is determined by the OVEDIT or EDITOR environment variable, or by the Editor setting in the configuration file.
You can use %f and %d as arguments in the editor command:
%fwill be replaced with the current file name.%dwill be replaced with the current line number.
For example:
envOVEDIT="vim +%d %f"
This will open the current file in vim at the specified line number.
4.30. <a name='save'></a>Save
If the file input is via a pipe, you can save it by pressing the save buffer (default S) key.
This will put you in input mode, so enter the file name.
Only the buffer currently in memory is saved.
ov(Save)file:savefile.txt
If the file name already exists, select Overwrite, Append, or Cancel.
ovoverwrite? (O)overwrite, (A)append, (N)cancel
4.31. <a name='ruler'></a>Ruler
The --ruler option displays a ruler at the top of the screen to help you see the column positions. (default key Alt+Shift+F9)
--ruleror--ruler=1: Displays a relative ruler that moves with horizontal scrolling.--ruler=2: Displays an absolute ruler that does not move with horizontal scrolling.--ruler=0: Disables the ruler (default).
consoleov --ruler README.md ov --ruler=2 README.md

Related styling: Ruler .
4.32. <a name='redirect-output'></a>Redirect Output
By default, ov does not show the screen when output is redirected.
To force display, use the --force-screen option:
consoleov --force-screen filename > output.txt
5. <a name='how-to-reduce-memory-usage'></a>How to reduce memory usage
Since v0.30.0 it no longer loads everything into memory.
The first chunk from the beginning to the 10,000th line is loaded into memory
and never freed.
Therefore, files with less than 10,000 lines do not change behavior.
The --memory-limit option can be used to limit the chunks loaded into memory.
Memory limits vary by file type.
Also, go may use a lot of memory until the memory is freed by GC.
Also consider setting the environment variable GOMEMLIMIT.
consoleexport GOMEMLIMIT=100MiB
5.1. <a name='regular-file-(seekable)'></a>Regular file (seekable)
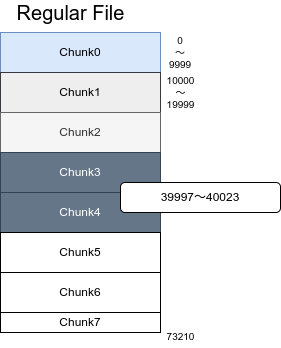
Normally large (10,000+ lines) files are loaded in chunks when needed. It also frees chunks that are no longer needed.
If --memory-limit is not specified, it will be limited to 100.
consoleov --memory-limit-file 3 /var/log/syslog
Specify MemoryLimit in the configuration file.
yamlMemoryLimitFile: 3
You can also use the --memory-limit-file option and the MemoryLimitFile setting for those who think regular files are good memory saving.
5.2. <a name='other-files,-pipes(non-seekable)'></a>Other files, pipes(Non-seekable)
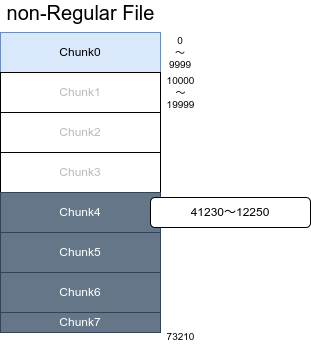
Non-seekable files and pipes cannot be read again, so they must exist in memory.
If you specify the upper limit of chunks with --memory-limit or MemoryLimit,
it will read up to the upper limit first, but after that,
when the displayed position advances, the old chunks will be released.
Unlimited if --memory-limit is not specified.
consolecat /var/log/syslog | ov --memory-limit 10
It is recommended to put a limit in the config file as you may receive output larger than memory.
yamlMemoryLimit: 1000
6. <a name='command-option'></a>Command option
| Short | Long | Purpose |
|---|---|---|
| -l, | --align | align the output columns for better readability |
| -C, | --alternate-rows | alternately change the line color |
| --caption string | custom caption | |
| -i, | --case-sensitive | case-sensitive in search |
| -d, | --column-delimiter character | column delimiter character (default ",") |
| -c, | --column-mode | column mode |
| --column-rainbow | column mode to rainbow | |
| --column-width | column mode for width | |
| --completion string | generate completion script [bash|zsh|fish|powershell] | |
| --config file | config file (default is $XDG_CONFIG_HOME/ov/config.yaml) | |
| --converter string | converter [es|raw|align|wordwrap] (default "es") | |
| --debug | debug mode | |
| --disable-column-cycle | disable column cycling | |
| --disable-mouse | disable mouse support | |
| -e, | --exec | command execution result instead of file |
| -X, | --exit-write | output the current screen when exiting |
| -a, | --exit-write-after int | number after the current lines when exiting |
| -b, | --exit-write-before int | number before the current lines when exiting |
| --filter string | filter search pattern | |
| -A, | --follow-all | follow multiple files and show the most recently updated one |
| -f, | --follow-mode | monitor file and display new content as it is written |
| --follow-name | follow mode to monitor by file name | |
| --follow-section | section-by-section follow mode | |
| --force-screen | display screen even when redirecting output | |
| --generate-config string | generate configuration [default|less] | |
| -H, | --header int | number of header lines to be displayed constantly |
| -Y, | --header-column int | number of columns to display as a vertical header |
| -h, | --help | help for ov |
| --help-key | display key bind information | |
| --hide-other-section | hide other section | |
| --hscroll-width [int|int%|.int] | width to scroll horizontally [int|int%|.int] (default "10%") | |
| --incsearch[=true|false] | incremental search (default true) | |
| -j, | --jump-target [int|int%|.int|'section'] | jump target [int|int%|.int|'section'] |
| -n, | --line-number | line number mode |
| --list-view-modes | list available view modes defined in the configuration file | |
| --memory-limit int | number of chunks to limit in memory (default -1) | |
| --memory-limit-file int | number of chunks to limit in memory for the file (default 100) | |
| -M, | --multi-color strings | comma separated words(regexp) to color .e.g. "ERROR,WARNING" |
| --non-match-filter string | filter non match search pattern | |
| --notify-eof int | notify at the end of the file | |
| --pattern string | search pattern | |
| -p, | --plain | disable original decoration |
| -F, | --quit-if-one-screen | quit if the output fits on one screen |
| -r, | --raw | raw escape sequences without processing |
| --regexp-search | regular expression search | |
| --ruler int | display ruler (=0: none, =1: relative, =2: absolute) | |
| --section-delimiter regexp | regexp for section delimiter .e.g. "^#" | |
| --section-header | enable section-delimiter line as Header | |
| --section-header-num int | number of section header lines (default 1) | |
| --section-start int | section start position | |
| --set-terminal-title | set terminal title | |
| --sidebar-mode string | apply predefined settings for sidebar mode | |
| --skip-extract | skip extracting compressed files | |
| --skip-lines int | skip the number of lines | |
| --smart-case-sensitive | smart case-sensitive in search | |
| --status-line[=true|false] | status line (default true) | |
| -x, | --tab-width int | tab stop width (default 8) |
| -v, | --version | display version information |
| -y, | --vertical-header int | number of characters to display as a vertical header |
| -m, | --view-mode string | apply predefined settings for a specific mode |
| -T, | --watch seconds | watch mode interval(seconds) |
| -w, | --wrap string | wrap mode [char|word] |
It can also be changed after startup.
7. <a name='key-bindings'></a>Key bindings
| Key | Action |
|---|---|
| General | |
| [Escape], [q] | * quit |
| [Ctrl+c] | * cancel |
| [Q] | * output screen and quit |
| [Ctrl+q] | * set output screen and quit |
| [Alt+Shift+F8] | * set output original screen and quit |
| [Ctrl+z] | * suspend |
| [Alt+v] | * edit current document |
| [h], [Ctrl+Alt+c], [Ctrl+F1] | * display help screen |
| [Ctrl+F2], [Ctrl+Alt+e] | * display log screen |
| [Ctrl+l] | * screen sync |
| [Ctrl+f] | * follow mode toggle |
| [Ctrl+a] | * follow all mode toggle |
| [Ctrl+F8], [Ctrl+Alt+r] | * enable/disable mouse |
| [S] | * save buffer to file |
| Moving | |
| [Enter], [Down], [Ctrl+n] | * forward by one line |
| [Up], [Ctrl+p] | * backward by one line |
| [Home] | * go to top of document |
| [End] | * go to end of document |
| [PageDown], [Ctrl+v] | * forward by page |
| [PageUp], [Ctrl+b] | * backward by page |
| [Ctrl+d] | * forward a half page |
| [Ctrl+u] | * backward a half page |
| [Left] | * scroll left |
| [Right] | * scroll right |
| [Ctrl+Left] | * scroll left half screen |
| [Ctrl+Right] | * scroll right half screen |
| [Alt+Left] | * scroll left specified width |
| [Alt+Right] | * scroll right specified width |
| [Shift+Home] | * go to beginning of line |
| [Shift+End] | * go to end of line |
| [g] | * go to line(input number or .n or n% allowed) |
| [,] | * go to mark number(input number allowed) |
| Sidebar | |
| [Alt+h] | * toggle help in sidebar |
| [Alt+m] | * toggle mark list in sidebar |
| [Alt+l] | * toggle document list in sidebar |
| [Alt+u] | * toggle section list in sidebar |
| [Shift+Up] | * scroll up in sidebar |
| [Shift+Down] | * scroll down in sidebar |
| [Shift+Left] | * scroll left in sidebar |
| [Shift+Right] | * scroll right in sidebar |
| Move document | |
| []] | * next document |
| [[] | * previous document |
| [Ctrl+k] | * close current document |
| [K] | * close all filtered documents |
| Mark position | |
| [m] | * mark current position |
| [M] | * remove mark current position |
| [Ctrl+Delete] | * remove all mark |
| [>] | * move to next marked position |
| [<] | * move to previous marked position |
| [*] | * mark by pattern mode |
| Search | |
| [/] | * forward search mode |
| [?] | * backward search mode |
| [n] | * repeat forward search |
| [N] | * repeat backward search |
| [&] | * filter search mode |
| Change display | |
| [w], [W] | * wrap toggle (character based) |
| [Alt+w] | * word wrap toggle |
| [c] | * column mode toggle |
| [Alt+o] | * column width toggle |
| [Ctrl+r] | * column rainbow toggle |
| [C] | * alternate rows of style toggle |
| [G] | * line number toggle |
| [Ctrl+e] | * original decoration toggle(plain) |
| [Alt+f] | * align columns |
| [Alt+r] | * raw output |
| [Alt+Shift+F9] | * ruler toggle |
| [Ctrl+F10] | * status line toggle |
| Change Display with Input | |
| [p], [P] | * view mode selection |
| [d] | * column delimiter string |
| [H] | * number of header lines |
| [Ctrl+s] | * number of skip lines |
| [t] | * TAB width |
| [.] | * multi color highlight |
| [j] | * jump target(.n or n% or section allowed) |
| [Alt+t] | * convert type selection |
| [y] | * number of vertical header |
| [Y] | * number of header column |
| Column operation | |
| [F] | * header column fixed toggle |
| [s] | * shrink column toggle(align mode only) |
| [Alt+a] | * right align column toggle(align mode only) |
| Section operation | |
| [Alt+d] | * section delimiter regular expression |
| [Ctrl+F3], [Alt+s] | * section start position |
| [Space] | * next section |
| [^] | * previous section |
| [9] | * last section |
| [F2] | * follow section mode toggle |
| [F7] | * number of section header lines |
| [Alt+-] | * hide "other" section toggle |
| Close and reload | |
| [Ctrl+F9], [Ctrl+Alt+s] | * close file |
| [Ctrl+Alt+l], [F5] | * reload file |
| [Ctrl+Alt+w], [F4] | * watch mode |
| [Ctrl+w] | * set watch interval |
| Key binding when typing | |
| [Alt+c] | * case-sensitive toggle |
| [Alt+s] | * smart case-sensitive toggle |
| [Alt+r] | * regular expression search toggle |
| [Alt+i] | * incremental search toggle |
| [!] | * non-match toggle |
| [Up] | * previous candidate |
| [Down] | * next candidate |
| [Ctrl+c] | * copy to clipboard |
| [Ctrl+v] | * paste from clipboard |
7.1. <a name='ctrl-key-and-corresponding-key-pairs-(commonly-treated-as-the-same-in-terminals)'></a>Ctrl key and corresponding key pairs (commonly treated as the same in terminals)
In many terminals, certain Ctrl key combinations and regular keys (such as Backspace, Tab, Enter) are treated as the same input. Here are typical examples:
| Ctrl Key | Corresponding Key |
|---|---|
| Ctrl+H | Backspace |
| Ctrl+I | Tab |
| Ctrl+M | Enter |
| Ctrl+J | Line Feed |
Depending on the terminal or application, these keys may not be distinguished and can behave identically.
Added in v0.50.0
However, in terminals that support the Kitty keyboard protocol (see Kitty Keyboard Protocol), these keys can be distinguished and sent separately.
8. <a name='customize'></a>Customize
8.1. <a name='style-customization'></a>Style customization
You can customize the following items.
The new style must be written in General:, Style:.
It is now also possible to write it in the Mode: item.
yamlGeneral: Style:
yamlMode: markdown: SectionDelimiter: "^#" Wrap: "character" Style: SectionLine: Background: "blue"
[!NOTE]
StyleOverStrikeandStyleOverLinemust be set at the top level and cannot be specified in theModesection.configStyleOverStrike: Bold: true StyleOverLine: Underline: true
- Header
- HeaderBorder
- LineNumber
- SearchHighlight
- ColumnHighlight
- MarkLine
- SectionLine
- SectionBorder
- MultiColorHighlight
- ColumnRainbow
- JumpTargetLine
- VerticalHeader
- VerticalHeaderBorder
- Ruler
- HeaderBorder
- SectionBorder
- VerticalHeader
- VerticalHeaderBorder
- Ruler
- LeftStatus
- RightStatus
- SelectActive
- SelectCopied
- PauseLine
It is recommended to use the Style: format for configuration. For example:
yamlGeneral: Style: Header: Foreground: "blue" Background: "white" Bold: true HeaderBorder: Foreground: "gray" Underline: true
For backward compatibility, the Style* format is still supported but will be deprecated in the future. For example:
yamlStyleHeader: Foreground: "blue" Background: "white" Bold: true StyleHeaderBorder: Foreground: "gray" Underline: true
Specifies the color name for the foreground and background colors.
Specify bool values for Reverse, Bold, Blink, Dim, Italic, Underline, UnderLineStyle, and UnderlineColor.
[Example]
yamlGeneral: Style: Alternate: Background: "gray" Bold: true Underline: true
| item name | value | example |
|---|---|---|
| Foreground | "color name" or "rgb" | "red" |
| Background | "color name" or "rgb" | "#2a2a2a" |
| Reverse | true/false | true |
| Bold | true/false | true |
| Blink | true/false | true |
| Dim | true/false | false |
| Italic | true/false | false |
| Underline | true/false | false |
| UnderLineStyle | 0-5 | 2 |
| UnderlineColor | "color name" or "rgb" | "red" |
Specify MultiColorHighlight and ColumnRainbow in an array.
yamlStyle: MultiColorHighlight: - Foreground: "red" Reverse: true - Foreground: "aqua" Underline: true ColumnRainbow: - Foreground: "white" Background: "black" - Foreground: "aqua" Background: "black" Underline: true - Background: "lightsalmon" UnderlineStyle: 2
8.1.1. <a name='underlinestyle'></a>UnderlineStyle
UnderlineStyle is specified by a number from 0 to 5. This corresponds to the escape sequence values.
| value | description |
|---|---|
| 0 | No underline |
| 1 | Single underline |
| 2 | Double underline |
| 3 | Curly underline |
| 4 | Dotted underline |
| 5 | Dashed underline |
8.2. <a name='customizing-the-bottom-status-line'></a>Customizing the bottom status line
You can customize the bottom status line.
The status line is displayed at the bottom of the screen and shows information such as the current file name, cursor position, and other details.
You can enable or disable the status line with the StatusLine option in the configuration file.
You can also toggle the status line using the command-line option --status-line=false or by pressing the shortcut key (default Ctrl+F10) during runtime.
yamlGeneral: StatusLine: false
For example, to start ov with the status line disabled:
shov --status-line=false README.md
If you set StatusLine to false, the status line will not be displayed except when necessary (such as during search input).
You can also customize the appearance and behavior of the status line by modifying the Prompt section in the configuration file.
yamlGeneral: StatusLine: true Prompt: Normal: ShowFilename: true InvertColor: true ProcessOfCount: true CursorType: 0 Input: CursorType: 1
| item name | description | default |
|---|---|---|
| ShowFilename | Display file name | true |
| InvertColor | Display file name inverted and changed color | true |
| ProcessOfCount | Update the progress while counting the number of lines | true |
| CursorType | Cursor type (see below) | 0 |
Currently, set CursorType as a number (not all devices support this).
| CursorType | Description |
|---|---|
| 0 | default |
| 1 | blinking block(▮) |
| 2 | steady block(▮) |
| 3 | blinking underline(_) |
| 4 | steady underline(_) |
| 5 | blinking bar(❙) |
| 6 | steady bar(❙) |
8.2.1. <a name='customizing-leftstatus-and-rightstatus-styles'></a>Customizing LeftStatus and RightStatus styles
You can customize the style of the left and right areas of the status line using LeftStatus and RightStatus under the Style section.
yamlGeneral: Style: LeftStatus: Foreground: "yellow" Background: "blue" Bold: true RightStatus: Foreground: "white" Background: "gray" Italic: true Prompt: Normal: InvertColor: false # Important: Set this to false to enable LeftStatus styles
[!NOTE]
IfInvertColoris set totrue, the file name and related areas will be displayed with inverted colors, and theLeftStatus/RightStatusstyles will not be applied.
To enable your custom styles, setInvertColor: false.
8.3. <a name='terminal-title'></a>Terminal Title
You can configure ov to set the terminal title to show the currently viewed file name or a custom title. This feature is useful for keeping track of what file you're viewing when using multiple terminal windows or tabs.
The terminal title can be customized using the --set-terminal-title command line option or by configuring it in the config.yaml file.
8.3.1. <a name='command-line-usage'></a>Command line usage
consoleov --set-terminal-title README.md
8.3.2. <a name='configuration-file'></a>Configuration file
yamlSetTerminalTitle: true
8.3.3. <a name='custom-terminal-title'></a>Custom terminal title
You can set a custom title using the --caption option (see Caption for more details):
consoleov --set-terminal-title --caption "My Custom Title" README.md
This will display "My Custom Title" in the terminal title instead of the file name.
[!NOTE]
The terminal title will be restored to its original value whenovexits.
This feature only works with terminal emulators that support ANSI escape sequences for title setting.
8.4. <a name='help-and-log-documentation-customization'></a>Help and Log Documentation customization
You can also customize the Help and Log documentation screens.
By adding HelpDoc and LogDoc entries at the same level as General in your configuration file, you can apply the same types of customizations as for General.
This allows you to individually style and configure the Help and Log screens.
yamlGeneral: Style: Header: Background: "blue" Bold: true HelpDoc: Style: Header: Background: "green" Bold: true LogDoc: Style: Header: Background: "aqua" Bold: true
For example, you can set different colors or styles for the Help and Log screens as shown above.
8.5. <a name='key-binding-customization'></a>Key binding customization
You can customize key bindings.
[Example]
yamldown: - "Enter" - "Down" - "Ctrl+n" up: - "Up" - "Ctrl+p"
See ov.yaml for more information.
[!NOTE]
Some keys may not work depending on the terminal.
See also Ctrl key and corresponding key pairs (commonly treated as the same in terminals).
If the same key is assigned to different actions, the end of the key bindings shown by Help or --help-key includes the duplicate warning.
helpDuplicate key bindings: Duplicate key [q] for exit, suspend
8.6. <a name='general-configuration'></a>General configuration
You can also customize the General configuration in the config.yaml file.
[!NOTE]
AllGeneralconfiguration items can also be set for each view mode under theModesection.
For example, you can specifyMultiColorWordsonly for markdown mode as follows:
yamlMode: markdown: MultiColorWords: - "ERROR" - "WARN" - "TODO" - "FIXME" - "NOTE"
| Name | Description | Example |
|---|---|---|
| Converter | Converter name | Converter: "es" |
| Align | Enable column alignment | Align: true |
| Raw | Display raw escape sequences without interpretation | Raw: true |
| Caption | The string to display instead of the file name | Caption: "My Caption" |
| ColumnDelimiter | Column delimiter character or regex | ColumnDelimiter: "," |
| SectionDelimiter | Section delimiter (can use regex) | SectionDelimiter: "^#" |
| JumpTarget | Specify jump target line or position | JumpTarget: "10" |
| MultiColorWords | Words to highlight (array) | MultiColorWords: ["ERROR", "WARN"] |
| TabWidth | Tab stop width | TabWidth: 4 |
| Header | Number of header lines to fix | Header: 1 |
| VerticalHeader | Number of characters to fix as vertical header | VerticalHeader: 4 |
| HeaderColumn | Number of columns to fix from the left | HeaderColumn: 2 |
| SkipLines | Number of lines to skip | SkipLines: 1 |
| WatchInterval | Watch interval (seconds) | WatchInterval: 2 |
| MarkStyleWidth | Width to apply the style of the marked line | MarkStyleWidth: 1 |
| SectionStartPosition | Section start position | SectionStartPosition: 0 |
| SectionHeaderNum | Number of lines in the section header | SectionHeaderNum: 3 |
| HScrollWidth | Horizontal scroll width (number, percent, or .int) | HScrollWidth: "10%" |
| HScrollWidthNum | Horizontal scroll width (number) | HScrollWidthNum: 10 |
| VScrollLines | Vertical scroll lines | VScrollLines: 2 |
| RulerType | Ruler type (0: none, 1: relative, 2: absolute) | RulerType: 1 |
| AlternateRows | Alternate row styling | AlternateRows: true |
| ColumnMode | Enable column mode | ColumnMode: true |
| ColumnWidth | Enable column width detection mode | ColumnWidth: true |
| ColumnRainbow | Enable rainbow coloring for columns | ColumnRainbow: true |
| LineNumMode | Display line numbers | LineNumMode: true |
| Wrap | Line wrapping mode (character, word, none) | Wrap: "character" |
| FollowMode | Enable follow mode | FollowMode: true |
| FollowAll | Enable follow mode for all documents | FollowAll: true |
| FollowSection | Enable section-based follow mode | FollowSection: true |
| FollowName | Follow files by name | FollowName: true |
| PlainMode | Enable plain (no decoration) mode | PlainMode: true |
| SectionHeader | Display section header | SectionHeader: true |
| HideOtherSection | Hide other sections | HideOtherSection: true |
| StatusLine | Display status line at the bottom | StatusLine: true |
| Prompt | Customize the bottom prompt | see Customizing the bottom status line |
9. <a name='vs'></a>VS
The following software can be used instead. If you are not satisfied with ov, you should try it.
- less
lessis versatile, feature-rich, and the de facto standard for pagers.
- most
mostis a general-purpose pager with split-window capabilities.
- pspg
pspgis a pager suitable for output of psql etc.
- moor
Mooris a pager. It's designed to just do the right thing without any configuration.
- slit
slitis a pager suitable for viewing logs.
- lnav
lnavanalyzes logs and can be used as a viewer.
- peep
peepis a pager that can work in a small pane.
10. <a name='work-together'></a>Work together
The following are not actually pagers and do not conflict. can work together.
- bat
batis an alternative to cat. It supports a lot of highlighting and automatically calls the pager.
- delta
deltaprocesses the diff for easy viewing and displays it. Call the pager automatically.
Please look at the documentation portal to configure them.
11. <a name='contributing'></a>Contributing
We welcome contributions to this project! Here are some ways you can contribute:
- Submit bugs and feature requests in the issue tracker.
- Review and test open pull requests.
- Improve or translate the documentation.
- Write code to fix bugs or add new features.
Before contributing, please read our Code of Conduct. We expect all contributors to follow these guidelines to ensure a welcoming and friendly environment for everyone.
To start contributing:
- Fork the repository.
- Create a new branch for your changes.
- Make your changes in your branch.
- Submit a pull request with your changes.
We will review your pull request as soon as possible. Thank you for your contribution!
Contributors
Showing top 12 contributors by commit count.

![dependabot[bot]](https://avatars.githubusercontent.com/in/29110?v=4)



Related Repositories

n8n-io/n8n
Fair-code workflow automation platform with native AI capabilities. Combine visual building with custom code, self-host or cloud, 400+ integrations.

ohmyzsh/ohmyzsh
🙃 A delightful community-driven (with 2,500+ contributors) framework for managing your zsh configuration. Includes 300+ optional plugins (rails, git, macOS, hub, docker, homebrew, node, php, python, etc), 140+ themes to spice up your morning, and an auto-update tool that makes it easy to keep up with the latest updates from the community.

yt-dlp/yt-dlp
A feature-rich command-line audio/video downloader

google-gemini/gemini-cli
An open-source AI agent that brings the power of Gemini directly into your terminal.

sherlock-project/sherlock
Hunt down social media accounts by username across social networks

junegunn/fzf
:cherry_blossom: A command-line fuzzy finder