Msm mae
Masked Spectrogram Modeling using Masked Autoencoders for Learning General-purpose Audio Representations
> 🚨 **Important Notice: A newer, better implementation is available.** 🚨 > > 🎉 The successor to this repository, **[Masked Modeling Duo (M2D)](https://github.com/nttcslab/m2d)**, is now available. > **If you are starting a new project, please use M2D instead of this repository.** > > - 🏆 **M2D pre-trained weights significantly outperform those provided here.** See the results below. > - 📦 **The M2D repository also distributes MSM-MAE pre-trained weights**, and they significantly outperform ... The project is written primarily in Jupyter Notebook, distributed under the Other license, first published in 2022. Key topics include: audio, deep-learning, masked-autoencoder.
Masked Spectrogram Modeling using Masked Autoencoders (MSM-MAE)
🚨 Important Notice: A newer, better implementation is available. 🚨
🎉 The successor to this repository, Masked Modeling Duo (M2D), is now available.
If you are starting a new project, please use M2D instead of this repository.
- 🏆 M2D pre-trained weights significantly outperform those provided here. See the results below.
- 📦 The M2D repository also distributes MSM-MAE pre-trained weights, and they significantly outperform the weights in this repository—even as MSM-MAE models.
- 🔁 M2D supports training MSM-MAE models as well as M2D models.
- 🗂️ This repository remains available as the reference implementation accompanying the original MSM-MAE paper.
👉 Go to the M2D repository: https://github.com/nttcslab/m2d 👈
🤔 Why M2D?
The table below compares EVAR benchmark results between MSM-MAE (this repository) and M2D models. M2D consistently and substantially outperforms MSM-MAE across all tasks.
M2D improves upon MSM-MAE in two key ways:
- 🧠 Instead of reconstructing masked patches in input space, M2D computes the loss in feature space using a momentum encoder—leading to richer representations.
- 📈 M2D achieves higher scores across all downstream tasks evaluated in our papers.
For training MSM-MAE-style models, M2D's codebase supports MSM-MAE training as well, so there is no reason to use this older implementation for new work. 🙌
About This Repository (Reference / Archive)
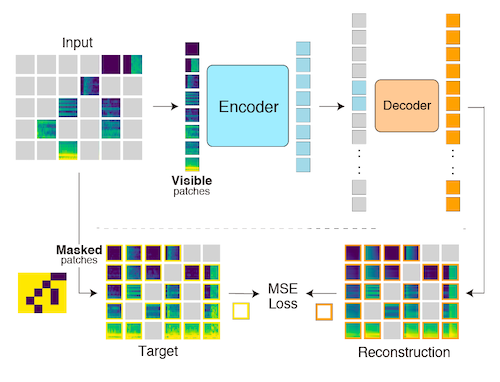
This repository is the original implementation of Masked Spectrogram Modeling using Masked Autoencoders (MSM-MAE), a self-supervised learning method for general-purpose audio representation. It includes:
- Training code that can pre-train models with arbitrary audio files.
- Evaluation code to test models under two benchmarks, HEAR 2021 and EVAR.
- Visualization examples and a notebook.
- Pre-trained weights.
If you find MSM-MAE useful in your research, please use the following BibTeX entry for citation.
BibTeX@InProceedings{niizumi2022masked, title = {Masked Spectrogram Modeling using Masked Autoencoders for Learning General-purpose Audio Representation}, author = {Niizumi, Daisuke and Takeuchi, Daiki and Ohishi, Yasunori and Harada, Noboru and Kashino, Kunio}, booktitle = {HEAR: Holistic Evaluation of Audio Representations (NeurIPS 2021 Competition)}, pages = {1--24}, year = {2022}, editor = {Turian, Joseph and Schuller, Björn W. and Herremans, Dorien and Kirchoff, Katrin and Perera, Paola Garcia and Esling, Philippe}, volume = {166}, series = {Proceedings of Machine Learning Research}, month = {13--14 Dec}, publisher = {PMLR}, pdf = {https://proceedings.mlr.press/v166/niizumi22a/niizumi22a.pdf}, url = {https://proceedings.mlr.press/v166/niizumi22a.html} }
History
- UPDATE (Apr, 2023): Masked Modeling Duo (M2D) is linked to this repository.
- UPDATE (Jan, 2023): PMLR paper is out. Replaced BibTeX and URL links with the PMLR website. Also fixed a bug.
- UPDATE (Dec, 2022): Added Vizualization & Audio example notebook. Now we can listen 👂 to how the reconstruction results sound!?
- UPDATE (Nov, 2022): Extended runtime inference
'encode_lms()'to output features for each layer.
1. Getting Started
The repository relies on the codes from facebookresearch/mae, and we patch our changes on these files.
- Download external source files from facebookresearch/mae, and apply a patches.
shcurl -o util/lars.py https://raw.githubusercontent.com/facebookresearch/mae/6a2ba402291005b003a70e99f7c87d1a2c376b0d/util/lars.py curl -o util/lr_decay.py https://raw.githubusercontent.com/facebookresearch/mae/6a2ba402291005b003a70e99f7c87d1a2c376b0d/util/lr_decay.py curl -o util/lr_sched.py https://raw.githubusercontent.com/facebookresearch/mae/6a2ba402291005b003a70e99f7c87d1a2c376b0d/util/lr_sched.py curl -o util/misc.py https://raw.githubusercontent.com/facebookresearch/mae/6a2ba402291005b003a70e99f7c87d1a2c376b0d/util/misc.py curl -o msm_mae/pos_embed.py https://raw.githubusercontent.com/facebookresearch/mae/6a2ba402291005b003a70e99f7c87d1a2c376b0d/util/pos_embed.py curl -o main_pretrain.py https://raw.githubusercontent.com/facebookresearch/mae/6a2ba402291005b003a70e99f7c87d1a2c376b0d/main_pretrain.py curl -o msm_mae/engine_pretrain.py https://raw.githubusercontent.com/facebookresearch/mae/6a2ba402291005b003a70e99f7c87d1a2c376b0d/engine_pretrain.py curl -o msm_mae/models_mae.py https://raw.githubusercontent.com/facebookresearch/mae/6a2ba402291005b003a70e99f7c87d1a2c376b0d/models_mae.py cd msm_mae patch -p1 < patch_msm_mae.diff cd .. patch -p1 < patch_main.diff
- If you need a clean environment, the following anaconda example creates a new environment named
ar:
shconda create -n ar python==3.8 conda activate ar
- Install external modules listed on requirements.txt.
1-1. Quick example
We have a utility runtime model, RuntimeMAE, which helps you to load a pre-trained model and encode your audios.
pythonfrom msm_mae.runtime import RuntimeMAE device = torch.device('cuda') # Prepare your batch of audios. This is a dummy example of three 10s waves. batch_audio = 2 * torch.rand((3, 10 * 16000)) - 1.0 # input range = [-1., 1] batch_audio = batch_audio.to(device) # Create a model with pretrained weights. runtime = RuntimeMAE(weight_file='80x512p16x16_paper/checkpoint-100.pth') runtime = runtime.to(device) # Encode raw audio into features. `encode()` will process automatically: # 1. Convert the input `batch_audio` to log-mel spectrograms (LMS). # 2. Normalize the batch LMS with mean and std calculated from the batch. # 3. Encode to feature. frame_level = runtime.encode(batch_audio) # This example ends up with frame-level 3840-d feature vectors for 63 time frames. # The `frame_level` will have a size of torch.Size([3, 63, 3840]). print(frame_level.shape) # You can get clip-level features by taking average of time franes. # The `clip_level` will have a size of torch.Size([3, 3840]) clip_level = torch.mean(frame_level, dim=1) print(clip_level.shape)
To get the best features, you can normalize your audio with normalization statistics of your entire input data and use them in your pipeline.
python# Calculate statistics in advance. This is an example with 10 random waves. means, stds = [], [] for _ in range(10): lms = runtime.to_feature(torch.rand((10 * 16000)).to(device)) means.append(lms.mean()) stds.append(lms.std()) dataset_mean, dataset_std = torch.mean(torch.stack(means)), torch.mean(torch.stack(stds)) # These can be numbers [-5.4919195, 5.0389895], for example. # The followings are an example pipeline. # Convert your batch audios into LMS. batch_lms = runtime.to_feature(batch_audio) # Normalize them. batch_lms = (batch_lms - dataset_mean) / (dataset_std + torch.finfo().eps) # Encode them to feame-level features. frame_level = model.encode_lms(batch_lms) # Calculate clip-level features if needed. clip_level = torch.mean(frame_level, dim=1)
To get features per layer, you can add return_layers=True.
python# Getting features per layer. y = rt.encode_lms(torch.rand(10, 1, 80, 900), return_layers=True) print(len(y), y[0].shape) # --> 12 torch.Size([10, 57, 3840]) # As normal, getting finale-layer features. y = rt.encode_lms(torch.rand(10, 1, 80, 900), return_layers=False) print(y.shape) # --> torch.Size([10, 57, 3840])
2. Evaluating MSM-MAE
2-1. Evaluating on HEAR 2021 NeurIPS Challenge Tasks
We evaluate our models on our paper using hear-eval-kit from on HEAR 2021 NeurIPS Challenge as follows.
NOTE: The folder hear has all the files we need to evaluate models on hear-eval-kit.
-
Install hear-eval-kit as follows:
shpip install heareval -
Download your copy of downstream dataset for 16 kHz. See HEAR NeurIPS 2021 Datasets@zenodo for the detail.
-
To evaluate our models, we need a local package which loads and runs our models. The followings shows an example for a model named
80x208p16x16_mymodel.shcd hear/hear_msm cp sample.py 80x208p16x16_mymodel.py ** Edit the 80x208p16x16_mymodel.py here, so that the value of `model_path` points to your model with an absolute path. ** cd .. pip install -e . -
We are on the folder
hear. Run the hear-eval-kit with your pre-trained model.shpython -m heareval.embeddings.runner hear_msm.80x208p16x16_mymodel --tasks-dir /your_copy/hear/tasks CUBLAS_WORKSPACE_CONFIG=:4096:8 python -m heareval.predictions.runner embeddings/hear_msm.80x208p16x16_mymodel/*
2-2. Evaluating on EVAR
EVAR is an evaluation package for audio representations used by our research papers such as BYOL-A and Composing General Audio Representation by Fusing Multilayer Features of a Pre-trained Model.
It supports the following downstream tasks: ESC-50, US8K, FSD50K, SPCV1/V2, VoxForge, VoxCeleb1, CREMA-D, GTZAN, NSynth instrument family, Pitch Audio Dataset (Surge synthesizer).
The following steps setup MSM-MAE on the EVAR.
-
Clone EVAR repository and prepare basic items.
shgit clone https://github.com/nttcslab/eval-audio-repr.git evar cd evar curl https://raw.githubusercontent.com/daisukelab/general-learning/master/MLP/torch_mlp_clf2.py -o evar/utils/torch_mlp_clf2.py curl https://raw.githubusercontent.com/daisukelab/sound-clf-pytorch/master/for_evar/sampler.py -o evar/sampler.py curl https://raw.githubusercontent.com/daisukelab/sound-clf-pytorch/master/for_evar/cnn14_decoupled.py -o evar/cnn14_decoupled.py cd .. -
Install MSM-MAE files on the cloned
evarfolder.shln -s ../../to_evar/ar_msm_mae.py evar/evar ln -s ../../to_evar/msm_mae.yaml evar/config cd evar sed 's/import evar\.ar_byola/import evar\.ar_byola, evar\.ar_msm_mae/' -i lineareval.py cd .. -
Setup downstream task datasets according to Preparing-datasets.md. The following is an example for setting up CREMA-D dataset.
shcd evar python evar/utils/download_cremad.py downloads/cremad python prepare_wav.py downloads/cremad work/16k/cremad 16000 cd ..
Once setup is complete, you can evaluate your models as follows.
-
For evaluating a model with an absolute path
/your/path/to/model.pth.shcd evar python lineareval.py config/msm_mae.yaml cremad weight_file=/your/path/to/model.pth -
If you want to save GPU memory, set a fewer batch size as follows. This example sets it as 16.
shcd evar python lineareval.py config/msm_mae.yaml cremad batch_size=16,weight_file=/your/path/to/model.pth
3. Training From Scratch
First, you need to prepare pre-training data samples; then, you can pre-train your model.
The following is an example to pre-train a model on FSD50K dataset.
-
Preprocess .wav files into log-mel spectrogram .npy files. The following converts from a source folder
/your/local/fsd50k/FSD50K.dev_audioto a new folderlms_fsd50kdev.shpython wav_to_lms.py /your/local/fsd50k/FSD50K.dev_audio lms_fsd50kdev -
Create a CSV file which is used as a list of pre-training samples containing a single column
file_name. The following example createstrainingfiles.csv.shecho file_name > trainingfiles.csv (cd lms_fsd50kdev && find . -name "*.npy") >> trainingfiles.csv -
Make some copies of samples for visualization. The following example makes 3 symbolic links. All the samples under the folder
vis_sampleswill be used to visualize reconstruction results of a checkpoint during training.shmkdir -p lms_fsd50kdev/vis_samples ln -s ../1240.npy lms_fsd50kdev/vis_samples/1240.npy ln -s ../106237.npy lms_fsd50kdev/vis_samples/106237.npy ln -s ../119949.npy lms_fsd50kdev/vis_samples/119949.npy -
Once your data is ready, start pre-training as follows.
shpython main_pretrain.py 80x208p16x16_your_test --input_size 80x208 --data_path lms_fsd50kdev --dataset trainingfiles --model=mae_vit_base_patch16x16
3-1. About run folders
The training loop creates a folder called the run folder to store artifacts of your training run, such as a log, visualizations, and checkpoints.
In the example above, the 80x208p16x16_your_test is the run folder name which has a format below:
<input_size>p<patch_size>_<your_free_string>
 - input_size: Two integers concatenated with `x`.
 - patch_size: Two integers concatenated with `x`.
 - your_free_string: Optional.
NOTE: When a model is evaluated by EVAR or hear-eval-kit, the input and patch size parameters written in the run name are used.
3-2. Evalidation during training
The training loop takes two actions for evaluating checkpoints during training: visualization and calling an external command quick_eval.sh (EVAR by default).
-
While training,
main_pretrain.pywill call a script namedquick_eval.shfor every 20 epochs by default. You can editquick_eval.shfor your purpose. -
The training loop also visualizes reconstruction results using checkpoints. You can find them under the sub-folder of the run folder, such as
<table><tbody><tr> <td><img src="misc/recon_126AbihZt28.png" alt="recon_126AbihZt28" width="250"/></td> <td><img src="misc/recon_A1TNpj9hHW0.png" alt="recon_A1TNpj9hHW0" width="250"/></td> <td><img src="misc/recon_v1Xn9GONUDE.png" alt="recon_v1Xn9GONUDE" width="250"/></td> </tr></tbody></table>80x208p16x16_tttt/19. The folder contains raw results in .npy and image files in .png as the following examples.
4. Visualization & Audio Examples
👉 Visualization example notebook and Vizualization & Audio example notebook are available. 👈
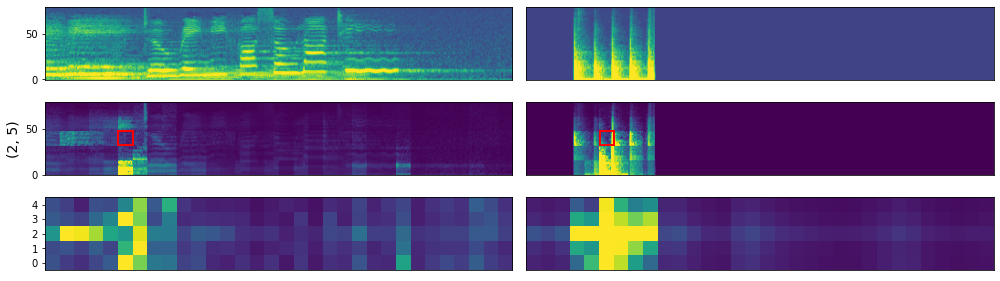
The Visualization example notebook shows how to visualize reconstruction results as well as attention maps.
- Download
AudioSetWav16k_examples.zipthat contains example wave samples from the releases and unzip the zip file in themiscfolder beforehand.
Here are reconstruction examples:
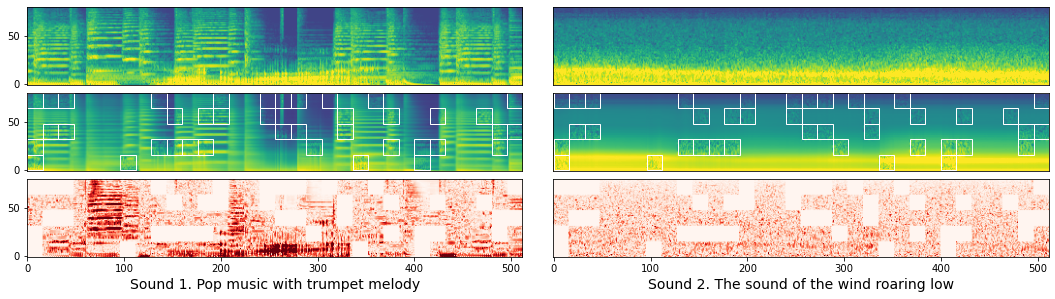
Here are attention map examples:
In addition, Vizualization & Audio example notebook shows how we can invert these log-mel spectrograms to audios using librosa.feature.inverse.mel_to_audio. Two examples from the notebook follow:
- 📣 Sound1 Input → 📣 Reconstruction
- 📣 Sound2 Input → 📣 Reconstruction
5. Pre-trained Weights and Network Structure Details
Three pre-trained weights are published on the releases,
and the followings are their EVAR task results:
| weight | esc50 | us8k | spcv2 | vc1 | voxforge | cremad | gtzan | nsynth | surge |
|---|---|---|---|---|---|---|---|---|---|
| 80x512p16x16_paper | 89.1% | 84.3% | 93.1% | 56.1% | 97.5% | 70.1% | 79.3% | 76.9% | 37.5% |
| 80x512p16x16_0425 | 88.9% | 84.0% | 92.4% | 56.5% | 96.8% | 67.6% | 81.4% | 76.1% | 37.4% |
| 80x208p16x16_0422 | 87.1% | 82.2% | 91.1% | 49.7% | 95.6% | 66.9% | 75.9% | 76.5% | 37.8% |
- 80x512p16x16_paper: This weight is the pre-trained weight used to calculate the numbers in the paper, trained on our old unpolished code. Cannot be used for visualizations due to a minor difference in the decoder structure.
- 80x512p16x16_0425: This weight is a pre-trained weight that is trained with the current code to check reproducibility.
- 80x208p16x16_0422: This weight is a pre-trained weight that is trained with the current code to check reproducibility.
FYI: You can check a notebook that summarizes EVAR task results.
5-1. Network Structure Details
Our ViT network implementation has three minor differences from the original MAE implementation, due to historical reason. (We have already been testing based on pengzhiliang/MAE-pytorch in late 2021, before the MAE implementation became available.)
- Our implementation follows BEiT, where the k bias is always zero in the Attention calculation. Though it is explained to be equivalent in terms of calculation results, we keep this implementation in our network for better reproducibility.
[CLS]token is removable by the option--no_cls_token.- The decoder uses 1d positional embedding. You can switch to the 2d version by the option
--dec_pos_2d.
6. License
See LICENSE for details.
Acknowledgements
- Our code is based on the MAE PyTorch/GPU re-implementation of the paper Masked Autoencoders Are Scalable Vision Learners.
- We also refer to another implementation of MAE, pengzhiliang/MAE-pytorch.
- We use nnAudio (KinWaiCheuk/nnAudio) for converting raw audio into log-mel spectrogram.
We appreciate these publicly available implementations and all the modules our experiments heavily depend on!
References
- MAE: Kaiming He, Xinlei Chen, Saining Xie, Yanghao Li, Piotr Dollár, and Ross Girshick "Masked Autoencoders Are Scalable Vision Learners," in Proc. CVPR, June 2022, pp. 16000–16009..
- MSM-MAE: Daisuke Niizumi, Daiki Takeuchi, Yasunori Ohishi, Noboru Harada, and Kunio Kashino "Masked Spectrogram Modeling using Masked Autoencoders for Learning General-purpose Audio Representation," in Proc. HEAR: Holistic Evaluation of Audio Representations (NeurIPS 2021 Competition), PMLR 166:1-24, 2022, (arxiv).
- BEiT: Hangbo Bao, Li Dong, and Furu Wei "BEiT: BERT Pre-Training of Image Transformers," in Proc. ICLR, 2022.
- HEAR 2021: Joseph Turian, Jordie Shier, Humair Raj Khan, Bhiksha Raj, Björn W. Schuller, Christian J. Steinmetz, Colin Malloy, George Tzanetakis, Gissel Velarde, Kirk McNally, Max Henry, Nicolas Pinto, Camille Noufi, Christian Clough, Dorien Herremans, Eduardo Fonseca, Jesse Engel, Justin Salamon, Philippe Esling, Pranay Manocha, Shinji Watanabe, Zeyu Jin, and Yonatan Bisk "HEAR 2021: Holistic Evaluation of Audio Representations," 2022, (arxiv).
- FSD50K: Eduardo Fonseca and Xavier Favory and Jordi Pons and Frederic Font and Xavier Serra, "FSD50K: an Open Dataset of Human-Labeled Sound Events," TASLP, vol. 30, pp. 829-852, 2022.
Contributors
Showing top 2 contributors by commit count.


Related Repositories

huggingface/transformers
🤗 Transformers: the model-definition framework for state-of-the-art machine learning models in text, vision, audio, and multimodal models, for both inference and training.

FFmpeg/FFmpeg
Mirror of https://git.ffmpeg.org/ffmpeg.git

mpv-player/mpv
🎥 Command line media player

OpenBMB/VoxCPM
VoxCPM2: Tokenizer-Free TTS for Multilingual Speech Generation, Creative Voice Design, and True-to-Life Cloning

ossrs/srs
SRS is a simple, high-efficiency, real-time media server supporting RTMP, WebRTC, HLS, HTTP-FLV, HTTP-TS, SRT, MPEG-DASH, and GB28181, with codec support for H.264, H.265, AV1, VP9, AAC, Opus, and G.711.

goldfire/howler.js
Javascript audio library for the modern web.