Clarity upscaler
Clarity AI | AI Image Upscaler & Enhancer - free and open-source Magnific Alternative
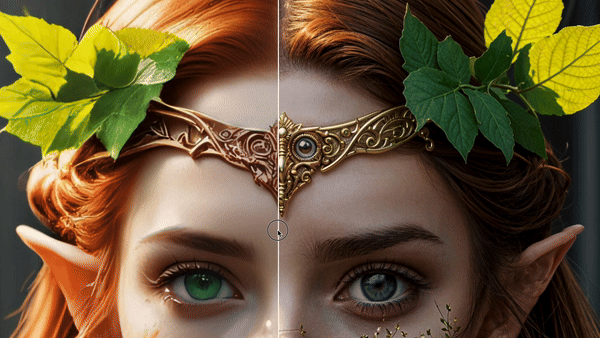
Clarity AI | AI Image Upscaler & Enhancer - free and open-source Magnific Alternative The project is written primarily in Python, distributed under the GNU Affero General Public License v3.0 license, first published in 2024. It has gained significant community traction with 5,089 stars and 533 forks on GitHub. Key topics include: ai, ai-art, image-upscale, image-upscaler, image-upscaling.


👋 Hello
I build open source AI apps. To finance my work i also build paid versions of my code. But feel free to use the free code. I post features and new projects on https://twitter.com/philz1337x
🗞️ Updates
- 03/05/2025: Flux upscaling only via my app and api: (http://clarityai.co/flux-upscaler)
- 06/19/2024: Pattern upscaling
- 05/24/2024: Increased Resolution to 13kx13k (https://x.com/philz1337x/status/1793983581636690379)
- 05/16/2024: Output file format: jpg/png/webp (https://x.com/philz1337x/status/1791431093641457824)
- 05/02/2024: Sharpen image
- 05/07/2024: ComfyUI node (https://x.com/philz1337x/status/1787905308439826920)
- 04/12/2024: Multi-step upscaling (https://x.com/philz1337x/status/1785269458304442565)
- 04/07/2024: Resemblance fixed (https://x.com/levelsio/status/1776729356120797265)
- 04/05/2024: Speed Improvements (https://x.com/philz1337x/status/1776121175195975888)
- 04/01/2024: Support custom safetensors checkpoints (https://x.com/philz1337x/status/1774772572632338435)
- 03/28/2024: Anime upscaling (https://x.com/philz1337x/status/1773342568543346738) (https://clarityai.co/anime-image-upscaling)
- 03/26/2024: LoRa Support (https://x.com/philz1337x/status/1772575319871959180)
- 03/21/2024: Pre downscaling (https://x.com/philz1337x/status/1770680096031961351)
- 03/18/2024: Fractality (https://x.com/philz1337x/status/1769756654533485050)
- 03/15/2024: Code release (https://x.com/philz1337x/status/1768679154726359128)
🔎 Upscaling with Flux
Flux Upscaling is now available at ClarityAI.co/flux-upscaler and is not open-source
- It supports Flux LoRas with a style or a face
- It's very good at faces, text, art, and generating error-free images
🚀 Options to use Clarity-Upscaler
Note that this repository is an implementation for cog. If you are not familiar with cog, I recommend the easier solutions. The free options are ComfyUI and A1111, while the paid but easy-to-use options are my app ClarityAI.co and the ComfyUI API Node.
🧑💻 App
The simplest option to use Clarity is with the app at ClarityAI.co
⚙️ API
To integrate Clarity Upscaler with an API into your application use: ClarityAI.co/API
🐰 ComfyUI
1. API node
- Open ComfyUI Manager, search for Clarity AI, and install the node.
- Create an API key at: ClarityAI.co/ComfyUI
- Add the API key to the node as a) envirement variable
CAI_API_KEYOR b) to acai_platform_key.txttext file OR c) inapi_key_overridefield of the node.
Full instructions: https://github.com/philz1337x/ComfyUI-ClarityAI
2. Free workflow
- Download the repo https://github.com/philz1337x/ComfyUI-ClarityAI and use the file free-wokflow.json
🕵️♂️ Cog
If you are not familiar with cog read: <a href=https://github.com/replicate/cog/blob/main/docs/getting-started-own-model.md>cog docs</a>
-
run
download_weights.py -
predict with cog:
sucog predict -i image="link-to-image"
🤹♂️ A1111 webUI
For a detailed explanation, use the tutorial in this post: https://x.com/philz1337x/status/1830504764389380466
https://github.com/AUTOMATIC1111/stable-diffusion-webui
- Use these params:
Promptmasterpiece, best quality, highres, <lora:more_details:0.5> <lora:SDXLrender_v2.0:1> Negative prompt: (worst quality, low quality, normal quality:2) JuggernautNegative-neg Steps: 18, Sampler: DPM++ 3M SDE Karras, CFG scale: 6.0, Seed: 1337, Size: 1024x1024, Model hash: 338b85bc4f, Model: juggernaut_reborn, Denoising strength: 0.35, Tiled Diffusion upscaler: 4x-UltraSharp, Tiled Diffusion scale factor: 2, Tiled Diffusion: {"Method": "MultiDiffusion", "Tile tile width": 112, "Tile tile height": 144, "Tile Overlap": 4, "Tile batch size": 8, "Upscaler": "4x-UltraSharp", "Upscale factor": 2, "Keep input size": true}, ControlNet 0: "Module: tile_resample, Model: control_v11f1e_sd15_tile, Weight: 0.6, Resize Mode: 1, Low Vram: False, Processor Res: 512, Threshold A: 1, Threshold B: 1, Guidance Start: 0.0, Guidance End: 1.0, Pixel Perfect: True, Control Mode: 1, Hr Option: HiResFixOption.BOTH, Save Detected Map: False", Lora hashes: "more_details: 3b8aa1d351ef, SDXLrender_v2.0: 3925cf4759af"
Contributors
Showing top 4 contributors by commit count.


Related Repositories

openclaw/openclaw
Your own personal AI assistant. Any OS. Any Platform. The lobster way. 🦞

obra/superpowers
An agentic skills framework & software development methodology that works.

NousResearch/hermes-agent
The agent that grows with you

n8n-io/n8n
Fair-code workflow automation platform with native AI capabilities. Combine visual building with custom code, self-host or cloud, 400+ integrations.

Significant-Gravitas/AutoGPT
AutoGPT is the vision of accessible AI for everyone, to use and to build on. Our mission is to provide the tools, so that you can focus on what matters.

f/prompts.chat
f.k.a. Awesome ChatGPT Prompts. Share, discover, and collect prompts from the community. Free and open source — self-host for your organization with complete privacy.