Taxy
A reverse proxy server with built-in WebUI, supporting TCP/UDP/HTTP/TLS/WebSocket, written in Rust.
A reverse proxy server with built-in WebUI, supporting TCP/UDP/HTTP/TLS/WebSocket, written in Rust. The project is written primarily in Rust, distributed under the MIT License license, first published in 2023. Key topics include: acme, http, http-proxy, http2, http3.
Taxy
A reverse proxy server with built-in WebUI, supporting TCP/UDP/HTTP/TLS/WebSocket, written in Rust.


![]()

🚧 Notice
Taxy is currently in early development. Please be aware that breaking changes may occur frequently, particularly when upgrading between minor versions (e.g., from 0.3.x to 0.4.x).
Overview
- Built with Rust for optimal performance and safety, powered by tokio and hyper
- Supports TCP, UDP, TLS, HTTP1, and HTTP2, including HTTP upgrading and WebSocket functionality
- Partial HTTP/3 support (incoming QUIC connections only; WebTransport not supported)
- Easily deployable single binary with a built-in WebUI
- Allows live configuration updates via a REST API without restarting the service
- Imports TLS certificates from the GUI or can generate a self-signed certificate
- Provides Let's Encrypt support (ACME v2, HTTP challenge only) for seamless certificate provisioning
Screenshot
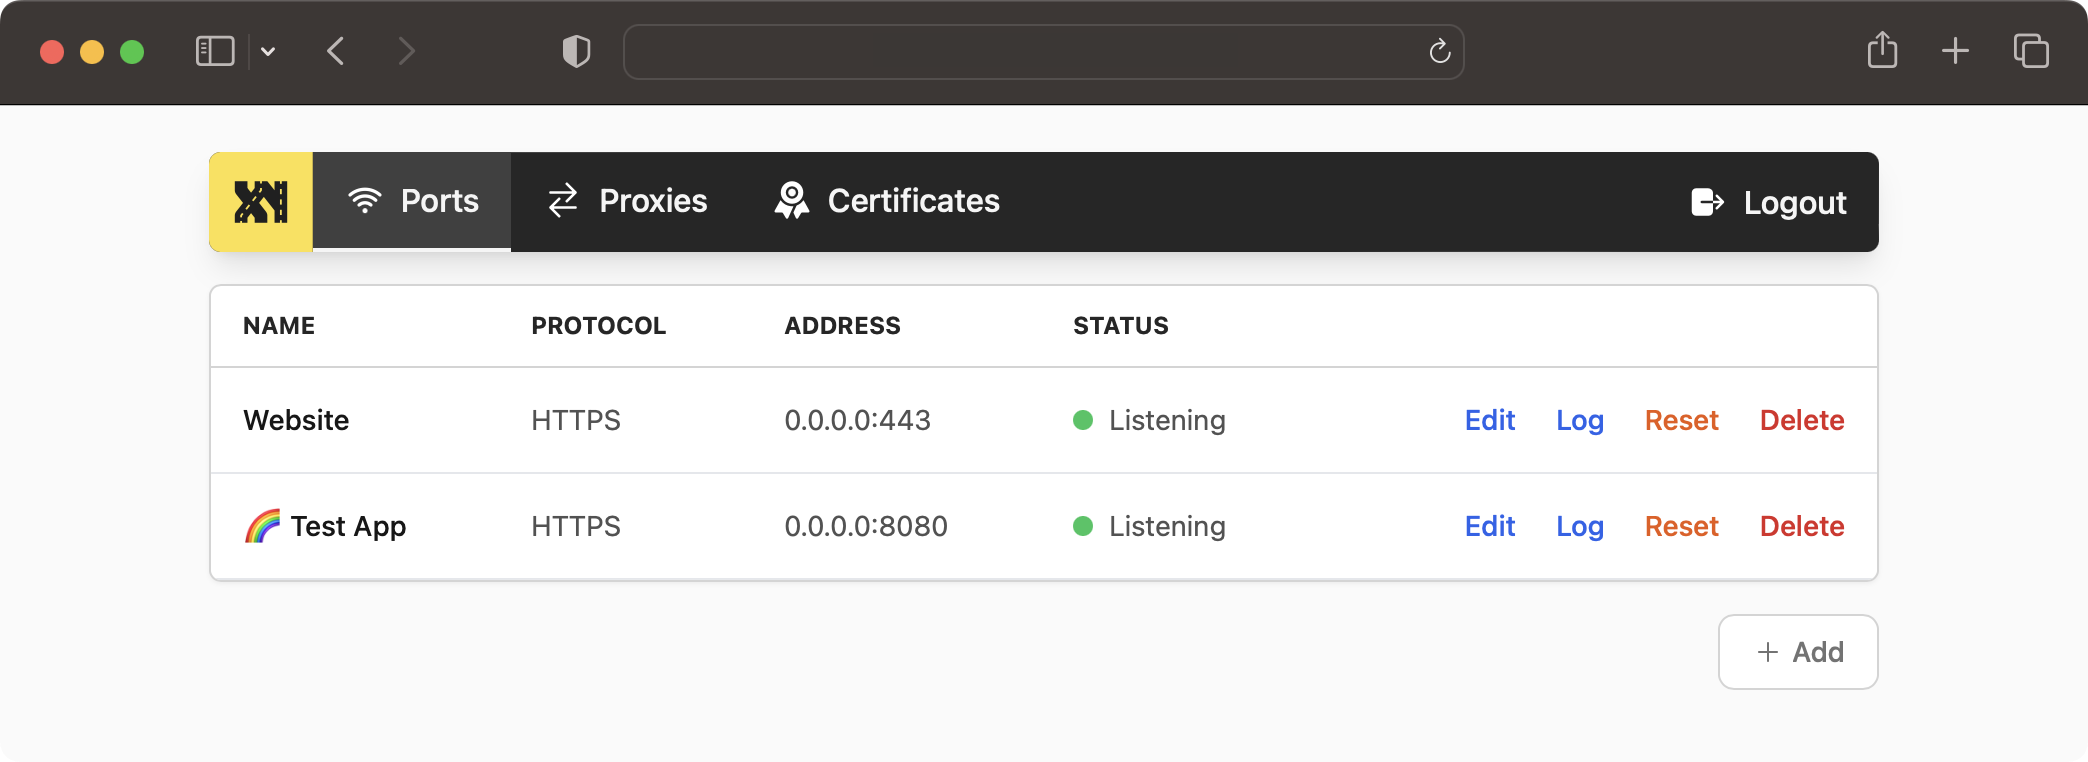
Web UI Demo
Visit https://demo.taxy.dev/. (username: admin, password: admin)
Please note, you can change the configuration freely, but due to the instance being behind a firewall, the configured proxies are not accessible from the outside.
Installation
There are multiple ways to install Taxy.
Docker
Run the following command to start Taxy using Docker:
bashdocker run -d \ -v taxy-config:/root/.config/taxy \ -p 80:80 \ -p 443:443 \ -p 127.0.0.1:46492:46492 \ --restart unless-stopped \ --name taxy \ ghcr.io/picohz/taxy:latest
To log in to the admin panel, you'll first need to create a user. Follow the steps below to create an admin user:
bashdocker exec -t -i taxy taxy add-user admin password?: ******
Docker Compose
Create a file named docker-compose.yml with the following content:
yamlversion: "3" services: taxy: image: ghcr.io/picohz/taxy:latest container_name: taxy volumes: - taxy-config:/root/.config/taxy ports: # Add ports here if you want to expose them to the host - 80:80 - 443:443 - 127.0.0.1:46492:46492 # Admin panel restart: unless-stopped volumes: taxy-config:
Run the following command to start Taxy:
bash$ docker-compose up -d
To log in to the admin panel, you'll first need to create a user. Follow the steps below to create an admin user:
bash$ docker-compose exec taxy taxy add-user admin password?: ******
Then, you can access the admin panel at http://localhost:46492/.
Cargo binstall
cargo-binstall automatically downloads and installs pre-built binaries for your platform. If there is no pre-built binary available, it will fall back to cargo install.
You need to install cargo-binstall first.
Then you can install Taxy with:
bash$ cargo binstall taxy
Cargo install
You need to have the Rust toolchain installed. If you don't, please follow the instructions on rustup.rs.
The package on crates.io comes bundled with the WebUI as a static asset. Thus, you don't need to build it yourself (which would require trunk and wasm toolchain).
bash$ cargo install taxy
Github Releases
Alternatively, you can directly download the latest pre-built binaries from the releases page.
You simply put the extracted binary somewhere in your $PATH and you're good to go.
Starting the server
First, you need to create a user to access the admin panel. You will be prompted for a password.
bash# Create a user $ taxy add-user admin $ password?: ******
Then, you can start the server.
bash$ taxy start
Once the server is running, you can access the admin panel at http://localhost:46492/.
Development
To contribute or develop Taxy, follow these steps:
bash# Clone the repository git clone https://github.com/picoHz/taxy # Start the server cd taxy cargo run # In a separate terminal, start `trunk serve` for the WebUI cd taxy-webui trunk serve
Gitpod
You can instantly start developing Taxy in your browser using Gitpod.

Similar projects
HTTP reverse proxies written in Rust:
Credit
The social preview image uses the photo by cal gao on Unsplash.
Contributors
Showing top 3 contributors by commit count.

![dependabot[bot]](https://avatars.githubusercontent.com/in/29110?v=4)
![deepsource-io[bot]](https://avatars.githubusercontent.com/in/16372?v=4)
Related Repositories

caddyserver/caddy
Fast and extensible multi-platform HTTP/1-2-3 web server with automatic HTTPS

acmesh-official/acme.sh
A pure Unix shell script ACME client for SSL / TLS certificate automation

certbot/certbot
Certbot is EFF's tool to obtain certs from Let's Encrypt and (optionally) auto-enable HTTPS on your server. It can also act as a client for any other CA that uses the ACME protocol.

Infisical/infisical
Infisical is the open-source platform for secrets, certificates, and privileged access management.

mailcow/mailcow-dockerized
mailcow: dockerized - 🐮 + 🐋 = 💕

go-acme/lego
Let's Encrypt/ACME client and library written in Go