Stable diffusion multi user
stable diffusion multi-user django server code with multi-GPU load balancing
> stable diffusion multi-user server API deployment that supports autoscaling, webui extension API... The project is written primarily in Python, distributed under the GNU General Public License v3.0 license, first published in 2023. Key topics include: aigc, stable-diffusion, stable-diffusion-api.
Stable Diffusion Multi-user
stable diffusion multi-user server API deployment that supports autoscaling, webui extension API...
Contents:
- [Option-1] Deploy with Django API
- [Option-2] Deploy using Runpod Serverless
- [Option-3] Deploy on Replicate
[Option-1] Deploy with Django API
Features:
- a server code that provides stable-diffusion http API, including:
- CHANGELOG-230904: Support torch2.0, support extension API when calling txt2img&img2img, support all API parameters same as webui
- txt2img
- img2img
- check generating progress
- interrupt generating
- list available models
- change models
- ...
- supports civitai models and lora, etc.
- supports multi-user queuing
- supports multi-user separately changing models, and won't affect each other
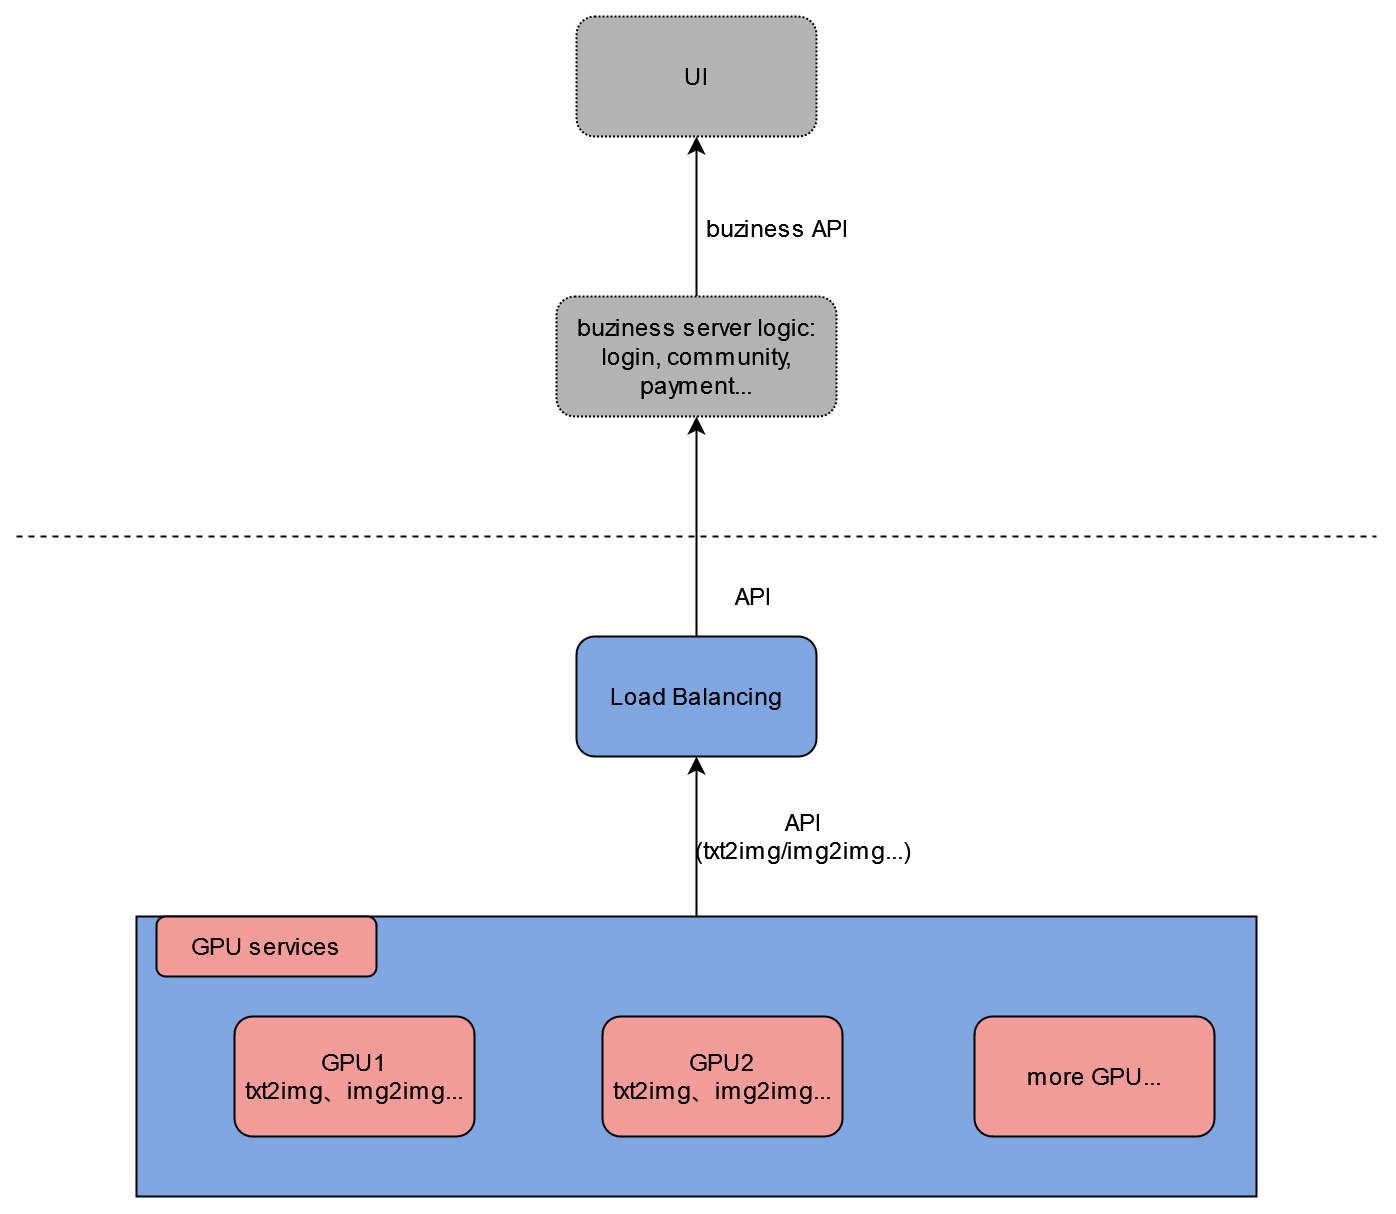
- provides downstream load-balancing server code that automatically do load-balancing among available GPU servers, and ensure that user requests are sent to the same server within one generation cycle
- can be used to deploy multiple stable-diffusion models in one GPU card to make the full use of GPU, check this article for details
You can build your own UI, community features, account login&payment, etc. based on these functions!
Project directory structure
The project can be roughly divided into two parts: django server code, and stable-diffusion-webui code that we use to initialize and run models. And I'll mainly explain the django server part.
In the main project directory:
modules/: stable-diffusion-webui modulesmodels/: stable diffusion modelssd_multi/: the django project nameurls.py: server API path configuration
simple/: the main django codeviews.py: main API processing logiclb_views.py: load-balancing API
requirements.txt: stable diffusion pip requirementssetup.sh: run it with options to setup the server environmentgen_http_conf.py: called insetup.shto setup the apache configuration
Deploy the GPU server
- SSH to the GPU server
- clone or download the repository
- cd to the main project directory(that contains
manage.py) - run
sudo bash setup.shwith options(checkout thesetup.shfor options)(recommende order: follow the file order:env,venv,sd_model,apache)- if some downloads are slow, you can always download manually and upload to your server
- if you want to change listening ports: change both
/etc/apache2/ports.confand/etc/apache2/sites-available/sd_multi.conf
- restart apache:
sudo service apache2 restart
API definition
/: view the homepage, used to test that apache is configured successfully/txt2img_v2/: txt2img with the same parameters as sd-webui, also supports extension parameters(such as controlnet)/img2img_v2/: img2img with the same parameters as sd-webui, also supports extension parameters(such as controlnet)- previous API version: checkout
old_django_api.md
Deploy the load-balancing server
- SSH to a CPU server
- clone or download the repository
- cd to the main project directory(that contains
manage.py) - run
sudo bash setup.sh lb - run
mv sd_multi/urls.py sd_multi/urls1.py && mv sd_multi/urls_lb.py sd_multi/urls.py - modify
ip_listvariable with your own server ip+port insimple/lb_views.py - restart apache:
sudo service apache2 restart - to test it, view
ip+port/multi_demo/url path
Test the load-balancing server locally
If you don't want to deploy the load balancing server but still want to test the functions, you can start the load-balancing server on your local computer.
- clone or download the repository
- requirements: python3, django, django-cors-headers, replicate
- modify
ip_listvariable with your own GPU server ip+port insimple/lb_views.py - cd to the main project directory(that contains
manage.py) - run
mv sd_multi/urls.py sd_multi/urls1.py&&mv sd_multi/urls_lb.py sd_multi/urls.py(Rename) - run
python manage.py runserver - click the url that shows up in the terminal, view
/multi_demo/path
Finally, you can call your http API(test it using postman).
[Option-2] Deploy using Runpod Serverless
Features:
- Autoscaling with highly customized scaling strategy
- Supports sd-webui checkpoints, Loras...
- Docker image separated with model files, upload and replace models anytime you want
see sd-docker-slim for deploy guide and also a ready-to-use docker image.
[Option-3] Deploy on Replicate
A replicate demo is deployed here
Features:
- Autoscaling
- latest sd-webui source code, latest torch&cuda version
- Docker image with torch 2.2
- Supports sd-webui API with extensions
- Supports sd-webui checkpoints, Loras...
Deploy steps:
- create a model on (replicate)(https://replicate.com)
- get a Linux GPU machine with 50GB disk space
- clone the repository:
git clone https://github.com/wolverinn/stable-diffusion-multi-user.git
cd stable-diffusion-multi-user/replicate-cog-slim/
- modify line-30 in
replicate-cog-slim/cog.yamlto your own replicate model - [optional] modify
replicate-cog-slim/predicy.py'spredict()function for custom API inputs & outputs - install cog: https://replicate.com/docs/guides/push-a-model
- install docker: https://docs.docker.com/engine/install/ubuntu/#set-up-the-repository
- download the checkpoints/Lora/extensions/other models you want to deploy to corresponding directories under
replicate-cog-slim/ - run commands:
cog login
cog push
Then you can see your model on replicate, and you can use it via API or replicate website.
Contributors
Showing top 1 contributor by commit count.
